What is Auto ISO? | Chris Bray Photography

When, and when NOT to use Auto ISO!

chris bray
Tutorial by Chris Bray

Some people love it, some people hate it, and most people have no idea how it works. The fact is, Auto ISO behaves quite differently in different camera modes, and it can be very useful in some situations and disastrous in others.

what is auto iso?
We all know ISO is your camera's sensitivity to light. Crank it up, and your camera doesn't need to collect so much light anymore to get a shot. In this way, higher ISOs enables you to shoot faster photos (ie use faster shutter speeds) not only in lower light, but also whenever you need to. With your ISO down on say ISO100 (insensitive) the fastest photo you might be able to take outdoors could be about 1/500th second – that's pretty quick, but it's not fast enough to freeze the wings on a bird in flight, or any fast moving animal. Dial your ISO up to ISO1600 or more and you'd be able to capture shots up to 1/4000th sec or possibly even faster, snap-freezing even the quickest movement. Of course we also know that if you turn your ISO up too far, you start to loose a bit of image quality, due to the appearance of ISO noise – that speckly, multicoloured texture that starts to degrade your high ISO images. Colours are also ever so slightly richer at lower ISOs, but often not noticeably so.

Generally speaking, you should keep your ISO as low as you can, to prevent ISO noise.

You'd only dial up your ISO if you needed to take a faster photo than you were able to achieve using your current ISO.

ISO noiseWith a fixed ISO, the less light there is (or the higher the f/# that you select) the longer the shutter has to stay open for to maintain correct exposure. Low light photos, or large f/# photos typically become very slow photos indeed, likely to suffer from both camera shake and subject movement blur. Lift your ISO up however, and you can maintain nice fast shutter speeds even with low light, or with larger f/# images. The trick is to only lift your ISO just enough that you're able to use the shutter speed you need to freeze the bird, or prevent camera shake, or whatever your creative objective is. If, for a certain situation, you're able to freeze the animal at say ISO 400 (perhaps allowing you say 1/1000th sec shutter speed) then there's no point in cranking your ISO any higher to say ISO 1600 (which would allow you 1/4000th sec) introducing more ISO noise with no real benefit (the animal still looks the same).

Conversely, if you've got your camera on a tripod and your scene is not moving at all, (perhaps some cityscape at night), then it really doesn't matter if the shutter speed is very slow (perhaps even 10 seconds or more!) and so in that case (even though it's a 'low-light' situation) you wouldn't want to lift your ISO.

So how on Earth does Auto ISO decide how high it should crank itself to give you what you need? Good question.

In Aperture Mode

(Av for Canon, A for other brands), you select the aperture (f/#) you want, and the camera then decides what shutter speed to use to give you correct exposure (or whatever exposure brightness you've requested using your +/- Exposure Compensation), using the ISO you've set. In Aperture mode, Auto ISO only lifts itself enough so that (if possible) the shutter speed becomes high enough that you shouldn't get camera shake blurring your photos. As a basic rule of thumb, the shutter speed needed to avoid camera-shake (ie to not need a tripod), is very approximately = 1/(focal length of your lens) seconds. I.e. if you're using a 400mm telephoto lens, then Auto ISO will lift itself to whatever ISO it needs to so that the shutter speed is around 1/400th second. If you zoom out to say 100mm, then Auto ISO will drop so that you're shooting at approximately 1/100th second. So in Aperture Mode, Auto ISO lifts itself just high enough to hopefully prevent camera shake. That's great, unless you're shooting a moving subject (ie people, wildlife, sport, or virtually anything except still-life and landscapes), in which case your subjects will often still come out blurry because the shutter speed that Auto ISO enabled was only just fast enough to prevent camera shake, but often nothing like fast high enough to freeze a fast moving subject! Also, what happens if you are shooting a stationary scene and your camera is on a tripod so you're quite happy for a slow shutter speed? Auto ISO isn't aware of this, so it'll still usually crank itself up to give you a nice fast hand-holdable photo (possibly with a fair amount of ISO noise) even though you'd much rather it stayed on a low, noise-free ISO. For those two reasons, I almost never use Auto ISO in Aperture Mode. It can't know the shutter speed you actually require, and so it'll often either lift itself way too high even when you had a tripod and were happy for the photo to be slow, or, more commonly, it'll only lift it high enough to prevent camera shake, when you needed a much faster shutter speed to freeze your subject!
high iso for fast photos

In Shutter Speed Mode

(TV for Canon, S for other brands), you of course select exactly the shutter speed you desire for your shot, and the camera determines the f/# to use to give you correct exposure (or whatever exposure brightness you've requested using your +/- Exposure Compensation), using the ISO you've selected. In Shutter Speed mode, Auto ISO only lifts itself enough so that you can shoot with the shutter speed you've requested. If you're asking for a slow shutter speed, or there's plenty of light around, then it'll select the lowest possible ISO (and thus lowest ISO noise – great!), and as you dial in faster and faster shutter speeds, then it'll incrementally boost your ISO just enough to enable you to get that shot. Sound useful? It is! If you really need to shoot at 1/2000th second to freeze this bird, then dial in 1/2000th sec in shutter speed mode and set your ISO to Auto, and it'll do it's best to lift itself high enough to give it to you, even in low light or if the bird flies through a shadowy space, at which time Auto ISO might have to lift itself to super high, noisy levels, but hey, you asked for that shutter speed and it's going to do what it can to give it to you. In Shutter Speed mode, I often find Auto ISO is extremely useful, and as you'll read in my 'Custom Shooting Modes' tutorial, I use it to good effect in my standard 'bird in flight mode'.

In Manual Mode

(M mode), you traditionally have to constantly, manually juggle your aperture (f/#), your shutter speed and your ISO every single time the light changes or you point the camera at a different part of the scene.

Let me just make a quick but VERY IMPORTANT point here about using Manual Mode: Unless you're under fixed, studio lighting, using complex flash setups or in a few other fairly niche situations, believe it or not, Manual mode is an incredibly archaic, slow and cumbersome mode to operate in. Modern cameras all have automatic light meters for a reason - so that you don't have to keep fumbling and scrolling through settings just because the lighting has changed since your last shot! There is a tragic misnomer in some photography circles that 'Real photographers use Manual Mode' or that if you're not in Manual Mode, you're in some way not getting the full creative control out of your camera. Believe me, nothing could be further from the truth - and it is a mistake to think that way, and you are doing yourself and your photography a disservice by believing it. Most people who say or who (infuriatingly) teach that Manual Mode is the 'proper' way to go, simply don't understand how modes like Aperture Mode actually work (i.e. it's not taking any creative control away from you, it's simply speeding up the process by finding the other half of a balancing equation for you, to instantly give you whatever exposure level you've asked for - you're still in complete control of the outcome.). Yes there are times when Manual mode is necessary - and I use it when I need to - but I (and the majority of Geographic magazine photographers, for example) actually take most of my photos in Aperture mode, somewhat less in Shutter Speed mode, and only a fraction using in Manual mode. Usually, manual mode just slows you down.

Auto ISO on a bird Using Auto ISO though in Manual Mode, if you dial in a set aperture and a set shutter speed, the amazing thing is that now (in most cameras) 
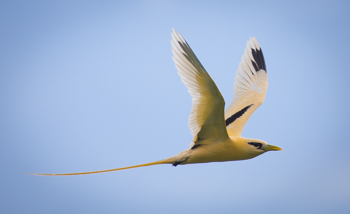
Auto ISO will raise/drop to whatever ISO value is needed (if possible) so that your selected aperture and shutter speed will result in correct exposure (or, in some cameras, whatever exposure brightness you've requested using your +/- Exposure Compensation)! Let's say you have a 400mm f/2.8 beast of a lens, and you're photographing birds. Very possibly you'll want perhaps 1/2000th sec shutter speed to freeze them in flight. The problem is that when asking for fast shutter speeds in shutter speed (Tv or S) mode for example, you'd find that the camera will pick the lens's largest aperture (smallest f/#) to help get lots of light in quickly for you. Unfortunately, sometimes (especially with a fast lens like f/2.8) this smallest f/# gives you way too shallow a depth of field, meaning only a thin slice of the bird is in focus, where as you'd prefer to have the whole bird sharp. However, in Manual Mode, you could now set your shutter speed (say 1/2000th sec) and also set your f/# to whatever you wanted (say f/4 or f/5.6 to give you that slightly deeper depth of field) and then Auto ISO will automatically set itself to whatever it needs for the current lighting/scene so that you get perfect exposure, every time - even if the bird flies down into the shade, or up against the bright sky, or perches on the ground! Amazing!

Obviously there are limits to this, and you do need to have a grasp on what are appropriate / possible values for this system to work, ie you can't ask your camera to shoot 1/4000th sec, using f/32 in low light and hope that the camera will still be able to give you correct exposure (your camera won't have an ISO high enough), or conversely, there is no ISO low enough for Auto ISO to select to enable you to leave the shutter open for 1 whole second, at f/2.8 during the middle of the day etc, but within reason, using Auto ISO in Manual mode can be an excellent and very useful tool. One downside on some slightly older Canon (and possibly other) cameras is that in Manual Mode, Auto ISO sets itself to give you 'mid-brightness' exposures only, and you may not have the option to adjust your desired exposure using +/- Exposure Compensation in Manual Mode, though I gather this has been remedied in newer Canon cameras.
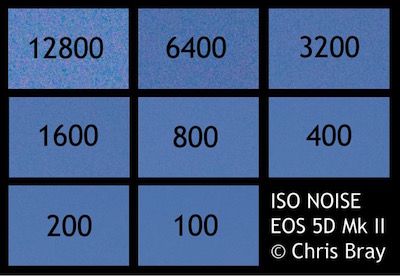
Note for some Nikons:

Importantly, for many Nikon cameras, Auto ISO has an extra level of confusion you need to be aware of. Unlike other brands where you can simply select 'auto' INSTEAD of a specific ISO value, some Nikons let you select whatever ISO value you like, yet separately turn 'Auto ISO' on or off as well?! So you could both have your ISO set to ISO 1600 and Auto ISO on - what on Earth does this do? Well, it mean Auto ISO will behave as explained above, except that IT WILL NOT SELECT AN ISO LOWER THAN YOUR PRESET VALUE! It's like setting a floor/min value for the Auto ISO. So in Aperture mode for example, it will still lift the ISO to whatever it needs too (assuming it's higher than your 'set ISO' value) to make your shutter speed fast enough to minimise camera shake, but even if there's plenty of sunlight and you could have shot happily at ISO 100 (and ISO 100 would have been selected by any other brand's Auto ISO), if you've set your ISO to 1600 and turned Auto ISO on, it still won't be able to pick an ISO lower than 1600 for you. So generally speaking, best practice for getting the most out of Auto ISO on these nikons is to ensure that whenever you turn Auto ISO on, you should also turn your ISO down to the lowest value (ie ISO 100) and then everything will behave as normal, it'll be able to go as high as it needs (you can usually set max ISO limits in the menu), and it will be able to go as low as it can also.

In Summary:


Auto ISO is very useful in Shutter Speed mode and it can save a lot of time and effort, and up your success rate dramatically. It's not always the right choice though, as sometimes I'll deliberately lift my ISO higher than Auto ISO would have, to force the selection of a larger f/# for a larger depth of field (as explained in my 'Custom Modes Tutorial'). Conversely, in Aperture Mode, I very rarely find Auto ISO very helpful; in fact, it ruins a lot of our safari guest's photos. In Manual Mode, Auto ISO can be a very handy tool when there's a particular aperture and shutter speed you really want to use, but it does have it's limitations and can require a bit of understanding to master.

max auto iso
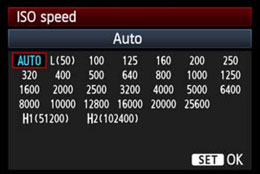
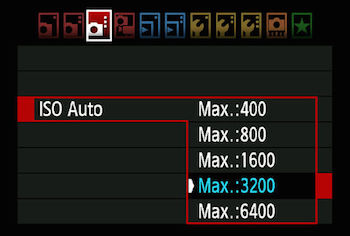
Of course various cameras behave slightly differently, and many have default (but changeable) limits set on the range of values that Auto ISO is allowed to shift within (the idea being you set the upper level to the ISO value that you feel produces the most amount of ISO noise you're willing to accept), etc.

For what it's worth, I shoot in Aperture mode most of the time, and so I prefer to just keep an eye on the shutter speed being selected for me and then manually adjust my ISO, only ever lifting it just enough to give me the kind of shutter speeds I know I need for a given situation. If I really do need a specific shutter speed then I'll shoot in Shutter Speed Mode (often with Auto ISO), and keep an eye on the selected f/# (and influence it via selecting a particular ISO if needs be).

Did you find this tutorial helpful?


If so, please click the 'G+' and Facebook 'Like' buttons below to help others find it, then enjoy other free tutorials here.

Thanks!


My Customers