Custom User Modes | Chris Bray Photography
chris bray
Tutorial by Chris Bray

Camera Custom User Modes


custom user modes
Custom Shooting Mode
Have you ever missed the shot because you were busy scrolling the right settings into your camera? I used to, until I learnt about using ‘Custom Modes’ or ‘User Modes’ which let you jump directly to pre-saved settings! You can save everything from the camera mode, focus mode, focus points, exposure compensation, drive mode and even default ISO and shutter speeds as a whole new camera mode. It’s perfect for the next time you’re shooting say ‘birds in flight’, ‘slow panning’ or ‘from a helicopter’ – you’ll never miss the shot again!

Not all cameras have custom/user modes, and don’t confuse them with ‘Custom Functions’, but most DSLRs do have ‘Custom Shooting Modes’ or ‘User Settings’ (or similar). Different brands call it different things; sometimes they’re saved in different ways and some let you save more than one - but I hope this quick tutorial will get you on your way help you get some better shots. It’s a trick we often show our CBP Voyager Club members on safari and they love it – so much so that one guest, Ruth P, suggested I write it as a tutorial. Good idea!

CUSTOM MODES I FIND USEFUL:

There are many scenarios where I tend to dial-in the same bunch of settings every time – for example trying to capture birds in flight, slow photos for panning, or fast photos to avoid shake when shooting from a moving car or vibrating helicopter. It therefore saves a whole lot of effort and often crucial time to pre-save these into custom modes. Save whatever setup you use most often, but for what it’s worth, here are the settings I often save for my custom modes:

Bird Mode:

bird mode custom user setting
Fast shutter speed, tracking focus,
+EC, multiple AF points, etc
Whether you’re trying to track and snap a bird in-flight, or sitting there waiting for a perched bird to launch itself into the air for that amazing wings-out shot, the camera settings are essentially the same and it’s my most-used custom mode.

The key thing for photographing a bird in flight is using a fast shutter speed to freeze the bird’s wings else it’s going to be a blurry mess. So switch to Tv mode (S mode for non-Canons) and dial up perhaps 1/2000th sec for your shutter speed. Set your ISO to ‘Auto’ so that it’ll do whatever it has to do so that you will get that shutter speed, even in lower light. Birds against the bright sky usually come out under exposed, so to combat this, dial up your exposure compensation to perhaps +2/3. Set your focus-mode to ‘AI Servo’ (‘AF-C’ ‘continuous’ for some brands) - this means that while you hold your shutter button half-pressed, the camera is always updating / tracking the focus, so that as the bird flies closer/further from you it’ll always remain in focus. This differs from ‘One shot’ (or ‘AF-S’ mode), which means the camera will only focus once (when you first half-press the shutter button). It’s hard to keep just the center AF point trained exactly on a bird that’s flapping past, so I’d also suggest enabling more than just that center AF point (some cameras let you use the middle five AF points, the whole middle zone, or perhaps just turn them all on). One last thing – set your camera’s ‘drive mode’ to continuous drive (or even ‘high speed continuous’ if available) so that when you hold the shutter button all the way down, the camera just keeps taking photos as fast as it can, one after the other, until you let go. Continuous shooting is perfect for getting a sequence of the bird in flight and also means you can find the best photo from the set.

birds using custom modes
Use ISO to force up the f/# to
get bigger Depth of Field
Bird Mode Tip: When asking for a fast shutter speed like this in Tv (or ‘S’) mode, your camera will usually automatically select your lens’s smallest f/# (ie largest aperture hole, to let light in as fast as possible). This makes the photo have a small Depth of Field (blurry background and foreground) which looks great, but sometimes, particularly with lenses that go down to an amazingly small f/# (like f/4), you may find that this DoF is too small and results in only part of the bird being in-focus with the far wing perhaps being ‘too far away’ and no longer sharp. Another reason why this small DoF can sometimes be annoying is that, with multiple AF-points enabled, you lose precise focus control. The camera may for example choose to focus on the wing, rather than the bird’s head, resulting in the same dilemma of only part of your bird being in focus. In these situations it’d be nice to be able to dial up your f/# a bit to give yourself a slightly larger DoF, but being in Tv mode, we don’t have control over our f/# - or do we? Well, you kind of do - via your ISO. Left on ‘Auto’, your ISO will only be lifted just high enough to get the shutter speed you’ve requested (using the smallest f/#). If you note what ISO the camera is auto-selecting, and instead dial in a higher ISO value, then more light would be getting in the camera than it needs. This means the camera will react by closing the aperture hole a bit (lifting your f/#), giving you a bigger DoF! That’s quicker than heading back over to Av mode and dialling in a bigger f/# and also then having to manually select an ISO that gives you a fast enough shutter speed.

Panning Mode:

panning using a custom mode
Slow shutter speed, tracking focus, etc
to capture movement in a subject.
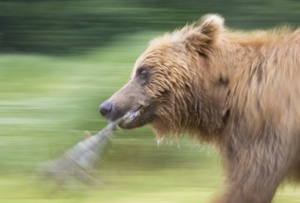
Using a deliberately slow shutter speed while tracking a moving subject can give beautiful results. Ideally the animal/bird appears sharp (because tracking it, you’ve kept the subject in the same part of the photo for the duration of the photo), but the background behind has streaked-out from movement blur (because you panned the camera during the photo). It’s a great way to capture a feeling of movement in an image but the problem is that the settings required are completely opposite to the camera settings you’d normally be using and by the time you’ve dialled them in, the moving subject has long since gone! Not anymore, though, if you set this ‘panning mode’ up as a custom mode like I do!

The key thing here is you need a slow shutter speed to capture that blurry background movement. It’s a balance - too fast and the subject won’t have moved far enough to give you any streaky background; too slow and it’ll be impossible to accurately track the subject the whole time, resulting in a blurry subject. It depends how fast your subject’s moving, and how long your lens is. You’ll get a feel for it, but a good starting point for birds and animals with a telephoto lens could be about 1/30th sec.

So switch to Tv mode (S mode for non-Canons) and dial your shutter speed down to 1/30th sec. Again, set your ISO to ‘Auto’ so that it’ll do whatever it has to do to give you that shutter speed irrespective of lighting conditions (it’ll usually pick the lowest, ISO100). Again, set your focus-mode to ‘AI Servo’ (aka ‘AF-C’) so it’ll track focus on the moving animal, and again, perhaps enable more than just one center AF point (so you don’t have to be so pedantic about making sure you don’t accidentally slip the one focus point off the animal as you track it). Again, set your camera’s ‘drive mode’ to continuous drive so you can just hold the button down and rattle off a whole series of photos, concentrating on trying to pan smoothly. Hopefully you will have, on at least one of them.

custom user modes save time
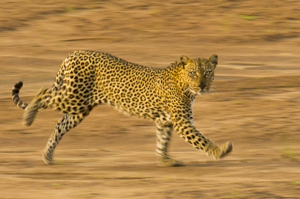
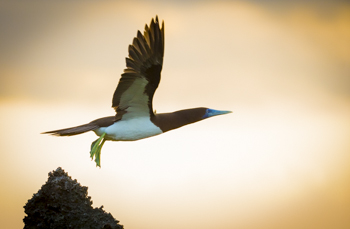
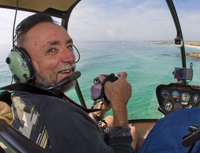
Panning shots show movement blur
Panning Mode Tip: Because you’re asking for such a slow photo, you may well find - especially during the middle of the day and when using a very slow shutter speed like 1/10th sec or longer - that the camera can’t help but over-expose the photo. You’ll likely just notice your photos are coming out too bright. If you’re observant, though, you’d have also noticed (when looking through the viewfinder before you took the shot) that the f/# it was automatically trying to use (likely the largest possible) was flashing, or was replaced with ‘hi’ or ‘low’. This is warning you that the camera can’t give you what you want. If this happens, you’ll have to scroll up your shutter speed up a bit faster until it can cope. Don’t try to solve the issue by dialling down your exposure compensation to make the photo darker – that won’t help. Think about it: at the slow shutter speed you’re asking for, the camera can’t help but capture too much light, so your photo is going to be brighter than desired. It can’t give you normal brightness, and it certainly can’t give you a darker photo, even if you ask for it by dialling down your EC. Dialling up your EC (asking for a brighter photo) may stop the camera flashing/complaining (because that basically translates to, “Well, yes, if you want a bright photo, I can do that,” but it hasn’t solved the problem – you’re photo’s still over exposed). The only way to fix it is to accept that you’re going to have to use a higher shutter speed and get less streaky-movement in the background. On the up side, though, it’ll be easier to keep the subject sharp because you don’t have to track it for as long!

‘From Car/ Helicopter Mode’:

aerial photography
Fast shutter speed to
reduce vibrations
The trick here is to get a fast enough shutter speed that you don’t get blurry photos from all the movement and vibrations. Just how fast you need it to be depends on how much everything’s moving, and how much you’re zoomed in, but FYI - from a buffeting, doors-off helicopter, I like to shoot at around 1/2000th. From a car with a standard-ish lens, you could likely get away with perhaps 1/500th sec. Set it up just like ‘bird mode’ above but you probably don’t need the pre-set over exposure, the continuous drive mode or the multi-point focus as you should still be able to select your subject accurately.

SAVING INTO CUSTOM MODES:

saving custom user mode settings
Custom / User Mode
Once you’ve dialled-in all the settings you want to save, you then just go into your camera menu, find ‘Custom Shooting Mode' or 'User Settings’ or similar. Note that this should not be confused with ‘Custom Functions’ which is where you can configure the finer details of your camera’s operation. After finding it, you can then select ‘Register/Store/Save Settings’ (or similar), and that’s it. If your camera lets you store more than one custom mode, you’d then be asked which slot to save it into, such as ‘C1’, ‘C2, or ‘C3’. Pretty straight forward.

saving multiple custom user modes
Custom Shooting Mode
Saving Multiple Custom Modes: If your camera lets you save several custom modes, and they’re accessed by rotating the camera’s big mode dial on top, save your most common custom mode into the last space (often C3). Why? Because then you don’t even need to look at what you’re doing when you need to quickly swap to that mode: just twist the mode dial all the way until it stops – which will be on that last setting! I keep ‘bird mode’ on my C3, because it’s the situation that requires the fastest setup time. Normally I don’t find myself climbing into a helicopter at split-second notice, so my ‘shooting from chopper mode’ is in C2.

USING YOUR CUSTOM MODES:

custom user modes
Custom Shooting Mode
Once you’ve got your default settings saved, whenever you switch your camera’s mode from say Av or Tv mode over to your new ‘Bird in flight mode’ (selected using the usual mode-selection dial/button), everything will jump to those pre-saved defaults, regardless of the settings you’re using at the time. It’ll then be exactly as if you’d laboriously changed to the appropriate camera mode (eg Tv), dialled in your settings, swapped to right drive mode, focus points, tracking focus etc. If today’s particular bird requires you to tweak things a little (such as over-expose more, or use an even faster shutter speed), then you can just go ahead and adjust things as normal, but know that when you leave ‘bird in flight mode’ and return to it later, the settings will return to those original, ‘saved’ default bird settings. Easy.

Did you find this tutorial helpful?


If so, please click the 'G+' and Facebook 'Like' buttons below to help others find it, then enjoy other free tutorials here.

Thanks!


My Customers