Camera Flash Basics | Chris Bray Photography
chris bray
Tutorial by Chris Bray

Camera Flash Basics


Ok, I'm going to let you in on a little secret: Controlling your flash (be that an in-built, external, or even macro ring flash) to get some awesomely creative effects is nothing like as hard as some photographers would have us believe. If you want to go measuring your 'Flash-to-subject distance' and calculating 'Flash Guide Numbers' etc then go right ahead, but thanks to modern TTL (Through The Lens) flash metering, controlling how bright the flashed bits of your photo look is just as easy as controlling how bright your normal photos look! You know that +/- Exposure Compensation slide-bar? Well, there's one for your flash too, and you can play with them independently to get some awesome effects. You also might want to know about flash Sync speed, and how to make the flash go off at the end of he photo etc.

camera flash basics
Your flash is very versatile!
When I first got into photography, flash was something I thought was either 'on' or 'off', and with your camera in 'Auto Mode' that's kinda the way it is, but when I started messing around with Av, Tv (S) mode etc, I soon realised that some weird stuff was going on (like the flash would go off, but the shutter might still stay open for ages and give me bizarre smeared backgrounds, as in the example to the left) and I decided to read up on flash. The apparent complexity horrified me, and for a long while I either avoided flash entirely, or if I had to use it, forced myself back into 'P' or even 'Auto Mode' to get predictable results.
mistake flash photo
Classic: What's going on
with my flash?!
It was only later, grappling with Flash in manual 'M' mode that I started to understand what was going on and really start to love what flash could let me do, and more recently still that I discovered that you're actually given almost the same control back in the likes of Av and Tv (S) mode, making it all wonderfully easy. So I thought I'd share it with you. Of course, as with most things in photography, flash can be as complicated as you like, and there certainly are some incredibly complex studio flash setups that require a huge amount of skill to know-how to set up that I don't even pretend to understand myself, but this simple tutorial/explanation below will open up a whole world of very creative and powerful options for your flash photography.

Using the flash in 'Av' mode:

using fill-flash for shadows
Av mode, flash OFF (top), ON (bottom),
gives 'Fill Flash' for harsh shadows.
Let's say you're in 'Av mode'. As you know, you can now scroll your aperture (ie your f/#) up and down, controlling your photo's Depth of Field. The camera determines how long the shutter speed needs to be, so that your photo comes out the brightness you asked for, which you set with your +/- EC 'Exposure Compensation' slide-bar (i.e. if your 'metering mode' is set to 'Evaluative Metering', and your +/- EC is set in the middle to zero, then your photo comes out on average 'mid brightness'. If you dial your +/- EC up to say +1, then your photo comes out '1 stop' brighter overall, etc). Now, in normal daylight shooting in Av mode (and with your ISO locked on some value other than 'Auto') and having locked in say f/16, if you pop up your inbuilt flash (or turn 'on' your mounted external flash) you'll usually find that nothing really changes in terms of the shutter speed that the camera decides to use - and if you take the shot, you basically get almost the same photo: The background (being too far away for the flash to have any effect on) stays exactly the same (as you'd expect, because all the camera settings remained the same). The things which were close enough to be illuminated by the flash (less than a couple of meters, generally) may tend to come out a bit brighter, particularly the regions which were dark to begin with - such as the shaded area under someones hat - these shadowy areas appear 'filled in' with the flash light bringing them up to 'normal' exposure brightness. What you have just done is use your flash a 'Fill-Flash', an effective tool for helping overcome the dark shadows caused by harsh sunlight.

well balanced night flash
Flash lit subject,
natural lit background.
Using Fill-Flash like this can be awesome during the day to fill-in shadows, to perk up a photo a bit, add glint to peoples eyes, or even to light-up an otherwise silhouetted back-lit subject (try that one, it really is fantastic!), but try the same experiment in low-light (or at night) and you'll get what initially seems like some weird, sluggish results where the shutter stays open for ages after the flash goes off - maybe even several seconds - which hand-held, makes a real mess of your photo (see example above). It makes sense though, because as before, in Av mode, (assuming you've got your ISO locked on a value other than 'Auto') the camera doesn't change it's settings if you have flash on or off: It's always going to set your shutter speed so that at your selected f/#, your overall photo (the background etc) comes out the brightness you asked for with your +/- EC, which at night, requires a very slow shutter speed! So, as usual for low-light photography, you'd need a tripod. If everything in your shot was a fair distance away, then the flashed and non-flashed photo would again, look the same. If you had someone (or something, a subject) close enough for the flash to illuminate, then it would appear nice and bright (correctly exposed) in your shot, with a correctly exposed (slow exposure) background. In this way you could get, for example, a nice brightly lit subject standing in front of a beautifully naturally-lit, low-light scene.
flash power
Leaving Flash EC at 0 the flashed subject stays the same,
but the background brightness changes with normal EC.

Using Exposure Compensation and Flash Exposure Compensation:

As you'd expect, if regardless of whether you have your flash on or not, you can change the brightness of the non-flashed parts of your photo using your camera's '+/- Exposure Compensation'. If you wanted that 'beautifully naturally-lit, low-light scene' to appear darker in the background behind your cashed subject, you'd simply dial down your EC to perhaps -1 stops, or lift it up to +2 for a much brighter scene, etc. The key thing to note is that the flashed parts of your photo remain the same brightness - because Flash Exposure Compensation is an entry separate control. You'll either find your 'Flash Exposure Compensation' control inside your menu, or many cameras have a dedicated Flash EC button on them somewhere that looks like the usual +/- brightness icon but with a little flash lightning bolt beside it, or if you have a big external flash, this Flash EC can also be dialled up or down on the flash itself (they do the same thing, and communicate/mirror with each other so it doesn't matter if you set it on the camera or the flash).
flash exposure compensation
Leaving normal EC at 0 the background stays the same,
but Flash EC controls the brightness of the flashed subject.
By default your Flash Exposure Compensation is set to middle/zero, so that it 'correctly' exposes the flashed parts (approximately to an average of mid-brightness), and so if your normal camera EC was also set to zero, then you're 'matching' the flash exposure to the ambient lighting, and you'll find the flashed parts seem to blend in fairly nicely with the unflashed parts. It follows that you could also leave the normal EC on zero, but dial up or down your Flash EC to control the brightness of the flashed parts. Perhaps you only want to throw a little bit of light into the shadows for a subtle fill-flash effect, or maybe you want to brighten up your flashed subject some more. Maybe you want to have normal exposure on your flashed subject, but dial the background exposure right down to make your perfectly exposed subject now stand out against a dark, even black-seeming background, despite it being the middle of the day! Suddenly, you see, just by balancing or shifting your Flash EC vs normal EC, you can have the most amazing control over how bright/dark your subject appears in front of it's surrounds, which you can also make brighter or darker to suit your creative vision! Awesome!
getting a black background with flash
Quick tip for awesome black backgrounds: I find that jet-black backgrounds can look amazing especially on close-up macro shots etc, and if your camera's inbuilt +/- EC only goes down to say -2 or -3 then you mightn't be able to get your background dark enough. To get this effect then, switch into Manual 'M' mode, and leave your Flash EC set to zero (or whatever flashed brightness you want), but dial your ISO way down, your f/# way up, and your shutter speed as fast as you can (usually limited the Flash Sync speed - see below) and this will give you as dark a background as possible. Depending on how bright the ambient light is, how large an f/# your lens can go etc, you might not be able to get it completely black but it's worth a try sometimes!
backlit flash
Backlit by flash!

How does TTL Flash Metering work?

Ever wondered how the flash knows how powerful it must make the flash so that your subject turns out the correct brightness you've asked for? Or ever pondered that if you positioned your subject closer to the flash then surely it must come out brighter, or if further away then less brightly lit? What was all that rubbish about having to measure 'Flash to subject distance' etc that I read about? How does the flash manage to set the flash power just right so that your subject always seems to come out at just the right level of brightness that you asked for? That's because thanks to modern 'Through The Lens' (TTL) flash metering, when you press the shutter button to take a photo, the camera actually sets of a quick, low-power 'pre-flash' (before the photo starts being taken), and measures the reflected flash light bouncing off your subjects to calculate how powerful it must make the flash in the real photo to ensure correct flash exposure! This is great because it means that it doesn't matter if your subject is closer or further away (so long as it's still close enough for the flash to reach), or - very awesomely - even if you perhaps turned your external flash to point off to the side to bounce it off a wall or something for some softer, more 3D side-lighting, the TTL flash metering will still work out exactly how much power it needs the flash to emit so that your subject still comes out at whatever flash exposure level you've asked for. You can even do crazy stuff like hold your flash behind a semi-transparent subject like a leaf or something (using a wifi flash or a hot-shoe extension cable) and it'll still calculate the flash output so that your now backlit subject comes out with 'correct' flash exposure. The possibilities are endless! I should point out there are some finer complications if your bothered to learn about them, such as the slightly different metering weighting algorithms used by say E-TTL (Canon's TTL system), i-TTL (Nikon's), P-TTL (Pentax's) etc and how each calculate their results, and how it changes flash output if the ambient light is extra bright etc etc, but I'm not going to get into that here at all. I don't even understand half that stuff, and I don't feel like I need to! Basically, they all fire that pre-flash and calculate/measure the flash power needed to illuminate your subjects to your required Flash EC level - if for some reason your flashed subject turns out a bit brighter or darker than you wanted because of some intricate weighting algorithm threshold, then you'd just dial your Flash EC up or down a bit until you got the effect you wanted. =) Easy.
fel button with flash

'FEL' Button - A pedantic side tip:

Sometimes, that quick pre-flash can make people blink, so that their eyes are actually then closed when the real flash goes off for the photo. In case you've ever wondered what the FEL button is for on your camera, it's a 'Flash Exposure Lock' button, and what that does is fire the pre-flash for you when you hit that button, and remembers the results, so that when you press the shutter button to take the photo a second or so later when people have stopped blinking, it doesn't need to fire another pre-flash. Don't stress about having to do this though, I've never done this, and I've actually re-assigned my FEL button to do other, more commonly useful things =)

Flash sync speed:

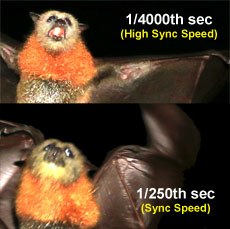
Although this tutorial is supposed to be about 'Understanding Basic TTL Flash Exposure' and not the intricacies of using flash, you do need to be aware that there is this thing called 'Flash Sync Speed' (used to be called x-Sync) which is the maximum shutter speed that you can use with your flash. Sync speed is a specification of your camera body, not the flash unit, and is to do with how your camera's shutter actually operates. If you don't want to know how/why, it's sufficient to just realise that if using flash, your camera will automatically realise it's not allowed to use a faster shutter speed than this Sync Speed (often between 1/180th - 1/250th sec). So, in 'Auto' or 'P' mode, you'd find that if the camera was going to use something faster than sync speed (say 1/1000th sec) for the photo, but then you turned the flash on, the camera would adjust your f/# (and ISO unless locked) for you so that it would now use a shutter speed that didn't exceed this sync speed. Even in 'Tv' (S) mode where you can normally choose whatever shutter speed you want, if you turn your flash on, you'll then find that your shutter speeds are capped at the sync speed. In 'Av' mode, if you demanded a too small f/# and/or too high ISO that required the shutter speed be faster than the sync speed, if you turn your flash on you'd then find your camera would flash the sync shutter speed at you, warning that it's going to use that sync speed, but it'll result in an over exposed photo, so don't take it! (i.e., turn your ISO down, or use a bigger f/#, or both, until it's happy to use that sync speed). Usually this sync speed is a limitation that your camera will realise and force upon you if it detects the flash is on, but if using a cheap remote/wireless flash, or any kind of flash that doesn't have 2-way comms going back to the camera to tell the camera it's on, then you need to be mindful of this sync speed issue yourself.

flash sync speed
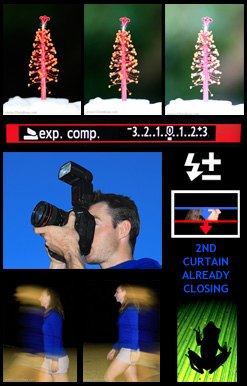
Understanding Sync Speed & Flash.
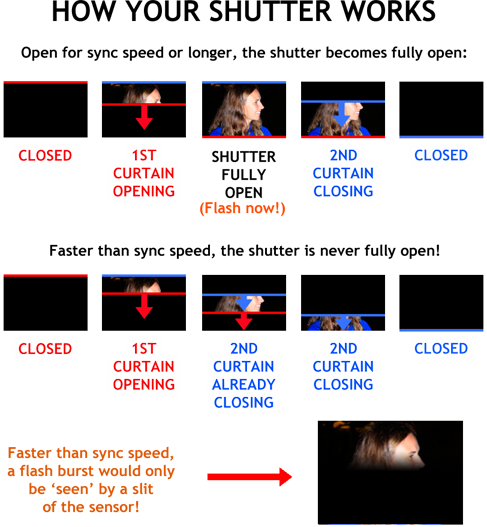
As for the how/why of Sync Speed, we tend to think of a camera's shutter as something that's either 'open' collecting light or 'closed'. In actual fact, the opening/closing is not instantaneous - when opening, what's actually happening is that the shutter 'curtain' is being quickly pulled down (usually top to bottom), revealing the sensor behind it as it opens. The amount of time it takes this curtain to fully open is the Sync Speed. A flash, by default, will fire the instant that the curtain is all the way open, so that the brief flash burst is 'seen' by the whole sensor - not much good if the sensor was still only half open! Once 'fully open' it then stays open collecting ambient light for your photo until time comes for the shutter to close. Unfortunately the same shutter curtain can't simply pull back up (bottom to top) to cover the sensor again, because that would mean the top bit of the sensor would have been left open/exposed for slightly longer than the bottom areas. So instead, there is a second curtain that closes the sensor off by sliding down (top to bottom, in the same direction the first curtain opened). If the shutter speed selected happened to be the same as the Sync Speed, then as soon as the first curtain had finished opening all the way, (and the flash goes off, if being used) the second curtain would instantly start closing behind it. If using a shutter speed faster than sync speed, then basically that second curtain would have to start closing from the top before the first curtain had opened all the way to the bottom, and so you essentially just get a 'slit' opening that passes over the sensor exposing it. The faster the shutter speed, the narrower the slit. You can imagine then, that if you were using a flash with a shutter speed faster than sync speed, there is no time when the sensor is fully revealed to 'see' the brief flash go off - the flash would only show up in whatever part of the photo the slot happened to be passing over at that instant. Not very useful.
high sync speed flash
bat flash photo
High Sync Speed Flash (top) is
able to freeze the bat in flight.

High sync speed flash:

Some fancy higher-end flashes can actually overcome this sync speed problem these days by actually having the flash basically go off lots of times very quickly (almost as if the flash was turned on continuously like a torch) as that shutter curtain 'slot' passes over the camera's sensor. This is called 'High Sync Speed Flash' and is really amazing, letting you take amazingly fast flash photos, up to whatever your cameras shutter speed can do, perhaps 1/4000th or even 1/8000th sec - a drawback though being that that because the flash has to go off quickly so many times, each mini-flash burst can't be as powerful as a normal single flash-burst, so when used in this continuos/torch/high-sync-speed mode, the effect is your flash can't be as bright, but still, with today's ISO capabilities etc this isn't such a problem. High Sync speed flash is amazing for freezing things like drops, even bats flying past etc.
rear curtain sync flash
Rear/2nd curtain sync (right e.g.)
looks better for movement.

Flashing at the end of the photo:

By default your flash goes off at the start of the photo (actually, it's when that first shutter curtain has fully opened). However, many flashes (even inbuilt ones) can often be set to 'Rear-Curtain' or '2nd Curtain' Sync mode, which just means the flash goes off at the end of the photo (just before that second/closing shutter curtain starts to close). This can be useful sometimes - because for a moving subject, say a person walking past, if the flash goes off at the start (default), you end up with a nice flashed imprint of where the person starts, but then this ghostly wafty trail in front of them where the person then continues to move forwards for the duration of the photo. It looks weird. It looks more 'natural' to see the flash imprint of the person/car/subject at the end of the photo with the movement/blur lines stretching out behind it showing where it's been. You will probably notice that even when set to go off at the end of the photo, the flash seems to also go off at the start too - weird? No - that's just the TTL pre-flash going off, before the photo actually starts recording! Makes sense, hey!

Using the flash in 'Tv' (S) mode:

No surprises here, as normal, using your camera in 'Tv' mode (Nikons etc call this 'S' mode), lets you choose what shutter speed you want, and the camera calculates the f/# for you to get whatever brightness of photo you've asked for using your +/- EC. It's exactly the same with your flash on, except that as mention above, you won't be able to scroll your shutter speed any faster than the sync speed of your camera (unless using fancy high-sync speed modes on fancy flashes). And just as in 'Av' mode, the Flash EC is separate, and you can scroll it up or down to adjust how bright the flashed parts of your photo turn out.

Using the flash in 'P' mode:

flash in p mode
Flash in P mode.
Night = no background.
Here, the flash is used quite differently. In P mode, (being basically just 1 step up from Auto mode, where you're not really in control of anything) the camera assumes that you don't have a tripod, and that you want your flash photos to behave like they do in Auto mode - where even at night, flash photos have fast shutter speeds and you don't get that weird effect like you do in 'Av' mode where after the flash goes off, in low-light, the shutter stays open for ages collecting enough ambient light to correctly exposure your background scene too. So, in P mode, if you turn your flash on, then the camera will automatically force the shutter speed somewhere between 1/60th sec and the flash sync speed, so that it's kinda fast enough to hand hold. Of course this means that in a low-light environment, the background won't have had enough time to expose correctly, so you'd end up with very dark backgrounds. As in 'Av', 'Tv' modes etc, you can still dial your EC and Flash EC separately, but you'll find that you're very limited in where you're allowed to scroll your f/# and shutter speeds in P. Basically, if you're wanting that traditional, fast, 'flash photo' in low light (yuck!) then if you hop back into 'P' mode, you'll get just that.

But wait, surely there's more?

You bet! Bouncing external flashes, stroboscopic flash, taking your flash off-camera, using gels to change the colour of the flash, positioning of the flash, using multiple flashes, wireless flashes, macro ring flashes, etc etc etc. Yes, this tutorial is only the beginning, but I hope that it'll at least open the door up for you to start exploring and enjoying the world of flash photography. If you think I have made a mistake in my explanations, or have missed something critical, please do let me know. Or if there is an area of flash photography you'd really love to learn more about, let me know and maybe I can either add it here or make it the subject of a future tutorial.

Did you find this tutorial helpful?


If so, please click the 'G+' and Facebook 'Like' buttons below to help others find it, then enjoy other free tutorials here.

Thanks!


My Customers