Macro Photography Tips | Chris Bray Photography
jonathan ives
Tutorial by Jonathan Ives

Macro Photography Tips


Macro photography often gets overlooked in favour of the 'big picture' subjects such as sunrises, landscapes and charismatic wildlife. However when we take the time to lower our eyes and pay attention to the smaller details, it becomes apparent that we're surrounded by a whole miniature world, full of fascinating subjects just waiting to be photographed! Macro photography has the ability to reveal beautiful details in subjects such as leaves, flowers, insects, raindrops and textures that many people don't ever even notice. It's for this reason that I find macro photography one of the most interesting fields in digital photography.
macro photo of ant
Leafcutter Ant in the Amazon.

What is macro photography?

In short, macro photography is photography of small things in a way that makes them look BIG. It's photography magnified, where ordinarily tiny subjects are made to look bigger than life-size in the frame. Technically a macro photo has a ratio of 1:1, i.e. the physical size of the subject takes up the same physical size on the sensor. For example if photographing a 10mm bug, the bug will take up 10mm of the sensor, therefore becoming quite a sizeable part of the photo. That said, in everyday usage, 'macro photography' can simply be considered close-up photography of small subjects.

So let's go through some tips for taking great macro photos:

Watch your focus!

Many people think that macro photography should be shot using manual focus. While there may be the rare occasion where autofocus is a challenge, the thought that manual focus is essential is largely a myth. More often than not Autofocus will actually achieve focus more quickly and more accurately than you can judge by eye using manual focus.

macro photo small depth of field
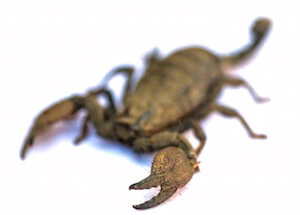
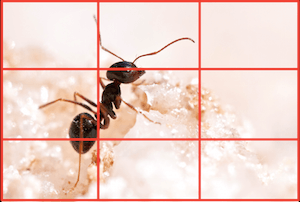
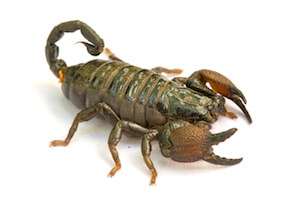
This isn't 'blurry', just a very
small DoF focused on the claw.
The challenge with focus often comes because the depth of field on a macro lens is small, especially if using a small f/number like f/2.8 (small f/number = small depth of field). Many people use too small a small depth of field, so that only a very specific part of the subject where the lens was focused is pin sharp, perhaps the antler or the front leg of the insect for example, and the rest of the subject appears blurry. This is a depth of field issue rather than being a problem with the autofocus. In this case of the scorpion, the autofocus has worked fine in grabbing focus, it has just been focused on the claw and the small depth of field means the rest of the body is outside the region that appears in focus. For this reason, it's important to make sure the autofocus is being pointed at the eye of your subject (or whichever piece you want the viewer to be drawn to). If you wish for more of the subject to become sharp than just the part where you focused, simply increase your f/number for a bigger depth of field (see tip below on depth of field) .

The trick with using autofocus on a macro lens is to not delay very long between grabbing the focus (half pressing the shutter button) and taking the shot (pressing the shutter button the rest of the way). If too much time elapses between grabbing the focus and then taking a shot, more often than not the photographer sways ever so slightly forward or back, shifting the part of the subject that will appear in focus. To get around this, autofocus and then take the shot quickly (being careful to still press the shutter button gently and smoothly to avoid camera shake!).

Rather than focus and then try and recompose for best composition, it can be handy to move to the selected autofocus point around so that your shot is already nicely composed, else you'll likely move a bit while recomposing which will shift the focus.

I'm only tempted to switch to manual focus if autofocus doesn't work. One such circumstance could be when I'm trying to get as close as possible to the subject. Rather than get too close to the point that autofocus fails, I'll switch into MF and dial the lens to the closest focus it can. By looking through the viewfinder, I then move slowly in and out until the subject becomes sharp. That way I know I'm as close as possible to the subject, making it as big as possible in the frame.
macro composition
Rule of Thirds.

Don't forget good composition:

Many people get so excited about making tiny subjects look big that composition is thrown out the window. The rules of good composition, however, still apply in macro photography and will really enhance an image. Try and aim for 'rule of thirds' by placing the subject (or a key part of it) on one of the virtual third lines.

Since the small subject is the main feature of the photo, try and look for minimalist composition. Often 'less' is 'more' in macro photography. Try and avoid crowding the image with unnecessary clutter.
background is important for macro photos
Boring grey vs green background.

Find a clean, contrasting background:

The small f/numbers available in macro lenses, combined with the fact that they can focus so close, allows for a very small depth of field which helps achieve blurry, uniform backgrounds behind your subject. Even so, it's certainly still worth paying attention to the colour of the background. Try and look for background colours that contrast the colour of the subject as this helps makes the subject 'pop' in the photo. If a background colour isn't desirable, try looking for a cleaner background by moving around or changing the angle. Sometimes placing a clean piece of white or black paper behind the subject as an artificial background can really enhance a photo. If you're keen to keep the surroundings looking entirely natural, try holding a uniform coloured leaf behind the subject.
back lighting macro photos
Top light vs back light.

Play around with lighting:

Photography is all about capturing light, so understandably lighting really impacts your photos. Thankfully, photographing something small and at close range gives the photographer several easy options for changing the lighting conditions. For example, if the sun is very bright and causing distracting shadows in the image, it's easy to create 'shade lighting' by simply having someone stand in front of the sun or by standing so that your own shadow falls completely across your subject, or using something like a hat to shade it. It's also worth thinking about the direction of light. By moving around and changing your angle, it's easy to move from 'front lighting' to 'side lighting' which often looks more 3D. It can sometimes even look great to 'back light' your subject and create a silhouette or rim-lighting glow around it's edges. This is sometimes easier to do if artificially lighting the subject with a torch or a flash. (See our flash basics tutorial). Backlighting something like a leaf for example by holding it into the sunlight can bring out amazing details and colours in it's structure.

flash macro photo
Flash, large f/#, -5 EC.
When a subject is very close to the lens, often the standard 'pop up' flash or a regular external flash will fire the light over the top of the subject, either missing it entirely or only partially illuminating it, creating shadows. One type of flash which is very helpful for macro work is a ring flash. Ring flashes clip onto the front of the lens, shining light from all sides, equally and evenly illuminate the subject from all angles, eliminating shadows. One trick when using a ring flash is to dial your normal exposure compensation right down (eg -5), while keeping your FLASH exposure compensation set to zero. This will illuminate the subject nicely but darken the surrounding background, making it possible to get a completely black background. Once again, check out our flash tutorial on how to do this.

Watch out for too-small a Depth of Field:

macro photo scorpion small depth of field
Only the claw is in focus.
While using a small depth of field is great for achieving a blurry background, it can also make it difficult to bring the whole subject into focus as the parts of the subject which are further away from the focus point will be blurred. To avoid this, try and place the subject on the same parallel plane from the lens. i.e. rather than shooting down or along the subject, where lots of the subject extends backwards in the scene away from you and thus out of focus, try to position your camera so that the front of the lens is parallel with the subject – ie shoot square-on, or perpendicular to your subject, so that all of your subject is the same distance from your lens, and thus the whole thing will be inside that small depth of field region, appearing sharp.

macro photo scorpion big depth of field
All sharp with a bigger DoF.
Another option is of course to pick a larger f/number for a larger depth of field, bringing more of the subject into focus. Don't be afraid to scroll away from f/2.8. Just be aware that as you scroll to a bigger f/number your camera will automatically slow down the shutter speed to compensate, so make sure to keep an eye on the shutter speed and turn up your ISO if you need to get a faster shot. The other disadvantage of using a larger f/number is that your background starts to become less softened and more distracting. This is another benefit of having a ring flash – the extra light makes it possible to use a big f/number (like f/22), bringing the whole subject into focus from front to back, especially if you dial your ambient exposure down to -5 to make the background go black so that even though it would be distractingly in-focus, you can't see it anyway.
colours in macro photos
Backlit leaf.

Look for details and patterns:

Spotting details that other people overlook is a really enjoyable part of photography, and macro photography can help you capture these details in a way no other photographic genre can. Even simple things, when photographed with a macro lens, can make for stunning, interesting images. Water droplets, leaves, flowers and feathers are all wonderful subjects to play around with when using a macro lens. When looking for shots, don't be scared of getting in really close and only capturing 'part' of the subject. These tighter photos can be really creative and interesting.

If you're trying to fill the frame with a textured surface such as a back-lit leaf, a good tip is to use a larger f/number than you'd expect, perhaps f/8 or more, to ensure the whole surface is sharp, otherwise the texture in the corner will be slightly further away than the part you focused on in the middle, and will thus be a little out of focus.

Watch out for camera shake & subject movement:

In macro photography the subject is generally quite close to the lens. When a lens focuses really close to a subject, some of the light entering the lens can actually be lost to the side of the camera's sensor. While we can't actually see this happening when looking through the viewfinder, it basically means that when focusing at close ranges, some light is wasted and, in order to compensate, the camera may need to collect a little bit more light than it would if focusing on a subject far away. This is getting a bit technical so you can read more about it here if you'd like.

In short however, to compensate for some potential light loss, your camera may often use slightly longer shutter speeds than you might expect. Longer shutter speeds are harder to hand hold and can lead to camera shake. In practice, to reduce camera shake when taking photos, try and make sure the shutter speed is faster than 1/focal length of the lens. Common macro lenses are around 100mm in focal length, so try and ensure your photo is being taken faster than 1/100th second if planning to hand hold the camera. If your subject is moving in the breeze (or flying around) you'll obviously need a much faster shutter speed than this to snap freeze the motion. Remember that because a macro magnifies everything, that slight swaying of a flower in the breeze is actually quite a lot of movement in your frame, so you need fast shutter speeds to freeze it. To ensure fast enough photos when using Aperture mode (Av or A), simply turn up your ISO and your camera will automatically calculate a faster shutter speed.

What is a Macro lens and which should I buy?

not a real macro lens
This is NOT a macro lens!
Be warned - some lenses write 'macro xxx cm' on them or have a macro icon (that little flower symbol) marked on them but are not necessarily macro lenses at all. Normally in this instance, the 'macro' simply stands for the minimum focus distance, i.e. how close that lens can get to the subject before it won't be able to find a focus. Every lens has a minimum focus distance (including macro lenses) however macro lenses have a significantly smaller minimum focus distance than a 'standard' lens. For example this 70-300mm has a minimum focus distance of 1.5m compared with this 100mm Canon Macro lens which has a minimum focus distance of 31cm. Due to the significantly smaller minimum focus distances of macro lenses, they enable the photographer to get closer to the subject and hence make the subject appear larger in the frame. This is called the 'ratio' of the lens and, technically speaking, true macro lenses have a ratio of 1:1. This means that a 12mm bug will actually take up 12mm on the camera's sensor, making for a big bug in the frame! Many standard lenses have a ratio of something like 1:4 (depending on the minimum focus distance), so the same 12mm bug will only take up 3mm on the sensor, and you'd have to zoom in on the resultant photo a lot to see any detail. It's also worth pointing out that true macro lenses are usually 'prime' lenses, with a fixed focal length (i.e. they don't zoom), and they state the word macro actually in the lens description eg 'Canon macro lens EF 100mm f/2.8 L IS USM'.

If looking to buy your first macro lens, we usually recommend a 100mm macro. Many brands make smaller macro lenses (such as a 50mm macro), but we find that the photographer then needs to get much closer to the subject in order to make it look big in the frame, which can sometimes scare, shade (or squash!) the subject, especially if photographing a small frog or insect. Canon actually make two 100mm macro lenses, one which retails for $652 online at Camera Pro and an 'L series' (luxury) version with inbuilt stabilizing for $1,127. We find the non-stabilised version does a pretty decent job and is a great place to start if you're on a budget. Macro lenses also make for great portrait lenses too as they can still photograph subjects further away and they go down to f/2.8 which helps get nice blurry background behind your model. Nikon make a similar type of lens to the stabilised Canon version, and its focal length is a 105mm. This retails for about $1,186 at Camera Pro.

What if I don't want to purchase a macro lens!?

There are some other options available to start exploring the world of macro photography without necessarily purchasing a macro lens right away. These options don't tend to achieve quite the same result compared with a true macro lens, but they can be fun to try and offer a cheaper alternative to start with.

'Extension tubes' are hollow tube segments that fit between a regular lens and the camera body and in doing so allow the lens to focus closer to the subject than it would normally be able to. They shouldn't be confused with 'tele extenders', which are similar (in that they fit in between the camera and the lens) but are actually designed for a different purpose, making your long lenses longer, and these have optics inside them. Canon make an EF 25mm extension tube which, if mounted between the camera and a Canon 50mm lens, will result in a 0.5x magnification of the subject. While extension tubes will fit on any lens with the same mount, on occasion they can result in vignetting around the corners of the image, like looking through a tunnel, and simple ones don't connect the lens's electronics to the camera, loosing things like AF, stabilizing and even aperture control.

Another option are 'Close up' lenses. These are like a lens filter that screws onto the front of a regular lens and acts basically as a magnifying glass. Just make sure you buy them with the correct filter thread size so they screw onto the front of your lens properly. Both of these options sometimes deplete the image quality a little bit, but are cheaper alternatives to purchasing a macro lens.

If you don't have any of those options, there is another 'trick of the trade' that you can try – reversing a standard lens. Yes, putting it on backwards! You can either buy reversing adaptor that lets you connect a lens (ideally a prime lens) onto your camera body in reverse, or, you can get a different adaptor (or even attempt to hand hold) a reversed prime lens up against the end of a regular lens already on your camera body - yep, butting the two 'outside' faces of the two lenses together! The result is pretty spectacular and can result in very high magnifications. Check out this link here for more details.

Tips for getting close to bugs:

As someone who has worked in the desert researching (and photographing) desert ants, I know first hand how hard it can be to find an insect that is willing to stay stationary long enough to focus on it and capture a decent image. A key part of photography is always patience, and this is certainly true for macro photography! When photographing subjects like insects, it actually helps to stay as still as possible. Rather than rushing around frantically trying to 'track' the bug, which normally causes them to run or fly faster to avoid the big threatening lens, success rate is usually higher if patience is employed. Try picking a single flower, for example, and waiting there for the butterfly or bee to land. If you observe the insects for a while you'll probably notice they are actually quite systematic in their behaviour, flying between a select few flowers and then returning again a minute or two later. This way you can get ready to snap the shot when the insect returns.

Another alternative is to set up a natural looking 'studio' (soil, a rock, a leaf) and place the subject on that. Because of the incredibly small depth of field generated by the macro lens, this can make the subject appear like it's in its natural environment. This means the scene can be set up on a table or similar, giving the option of introducing an extra lighting source (such as a lamp) if that helps better light the subject. Just don't keep the insect captive for too long!

Did you find this tutorial helpful?


If so, please click the 'G+' and Facebook 'Like' buttons below to help others find it, then enjoy other free tutorials here.

Thanks!


My Customers