Photographing the Moon| Chris Bray Photography
photographing the moon

How To Photograph the Moon

Jonathan Ives
Tutorial by Jonathan Ives

Shooting for the moon... It's easier than you think!

The moon has always been a source of fascination. In fact, this July was the 45th anniversary of man first walking on the moon. For those of us with a camera, this orbiting celestial body - so close yet so far away - has often been a target for our lens. However, many of us see beautiful images of the moon and its cratered surface but, when attempting to capture a similar image ourselves, suffer frustrating results.

You don't need to fly an Apollo mission to achieve better results. Believe it or not, photographing the moon is easier than you think. So to celebrate the 45th anniversary of Neil Armstrong's giant leap for mankind, we wanted to help you capture your own amazing shots of the lunar surface.

Understand your subject.

Now, before we get into the nitty-gritty of picking your camera settings, it's worth knowing one or two things about our subject (the moon) and its orbit around Earth. This will actually help you in your pursuit of a shot that's really 'out of this world' (pun intended).
phases of the moon
The phases of the moon.

Phases of the moon:

Without going into too much detail, the moon has different 'phases'. While we are always seeing the same 'side' of the moon from Earth, its position in relation to the sun (which is lighting its surface for us to see) means we see different amounts of that surface. This happens in a regular cycle known as lunar phases.

When it comes to photography, many people start out photographing a full moon. While this is obviously the biggest and brightest phase (we can see the entire surface illuminated), if you want to capture the detail and texture on the moon's surface it's actually better to photograph the moon when it's NOT full. This is because the beautiful detail of the moon is actually accentuated by shadows and the contrast of light and dark near the moon's 'terminator' i.e. the border of the moon where it turns from bright to shadow. In a full moon there is no terminator (border of shadow) and therefore the 3D depth and detail of the surface is somewhat lost to us. Just like in portrait photography, we need shadows to reveal shape and texture.

The best phases during which to photograph the moon are when it is a gibbous moon (i.e the moon is more than half illuminated). Whether it is 'waxing' (getting bigger towards a full moon) or 'waning' (getting smaller after a full moon) doesn't matter much. While small crescent moons are very interesting, they often don't provide enough size for really dramatic images. It's worth checking a lunar calendar in the newspaper or on your smart phone to know when the moon is going to be best for photography (and when it will be visible in the night sky – it rises and sets just like the sun, but on its own schedule). Very simply, a couple of days either side of a full moon are usually ideal.
super moon vs normal moon
A super moon can appear up to 14% larger.

What about a 'super' moon?

A lot of people talk about photographing a 'super moon'. In short, the moon's 'circular' orbit around Earth is actually more of an oval shape (an elliptical orbit). This means that at certain times the moon is actually closer to earth than at other times. When a full moon coincides with its closest approach we can call it a 'super moon'. Astronomers (and some astronomy aps on your smart phone) call it by its technical name: the moon's 'perigee'. It's worth noting when these perigees happen because, if they coincide with an illuminated moon, the moon can appear up to 14% larger to us on earth and 30% brighter which is excellent for photographing it! The recent July and August 2014 full moons were super moons, and the upcoming 8th September 2014 is also a super moon! A couple of days either side of this will be an excellent opportunity to take your photos. You can find out when the moon is closest by looking here: www.timeanddate.com/astronomy/moon/distance.html Of course you can still photograph a moon that isn't a 'super moon' and get great results!
what lens to photograph the moon
Use your longest lens.

What you need:

  • Your longest lens. 200mm, 300mm, 400mm (or longer if you have it!). You could even put on a tele-extender if you've got one. The longer the better in this case. The moon is bright but because it's so far away it will appear small in your frame so pick your longest focal length to zoom in as much as you can.
  • A clear night (and the moon to be out... obviously!)
  • Sturdy tripod and cable release to remove tripod wobble when pressing the shutter button (these are handy but not essential – a 2-second timer delay in your 'drive mode' settings will also work instead of a cable release, and you can even shoot the moon without a tripod, providing your shutter speed is fast enough to prevent significant camera shake - you may just need to turn up your ISO a bit more to achieve this).

Shoot in RAW.

This is in your image quality settings. While shooting large JPEG's is adequate for most of your photography, in this case you'll benefit from doing a fair bit of post processing on your image so shooting in RAW allows you to pull a bit more detail out of your shots on the computer later. Just be aware that the files are significantly larger in size, so they will fill up your memory card a lot faster. For those who are really keen on post processing there is an extension section below you can try which involves stacking a few images together in order to increase saturation without introducing too much 'noise' in your final photograph.
lock focus with MF to photograph the moon
Lock focus by selecting MF

Set (and lock) your focus.

The moon is plenty bright enough for your camera to autofocus on. Once you've grabbed an autofocus, you can 'lock' this focus distance in by flicking the AF/MF switch on the side of your lens to MF. Assuming you don't rotate the manual focus ring, you've now 'locked in' the focus - meaning that you won't need to keep Autofocusing for every shot. If you'd like to be super accurate, you can zoom in on the moon x10 in 'live view' on your LCD screen and tweak the manual focus ring to ensure the craters are precisely in focus.

Use a cable release (or an in-built 2-second timer delay) to take your photos as this will help reduce tripod wobble, especially since you're using a long lens! When taking multiple photos, make sure you let the tripod absorb the shake between shots.
AV mode to take a photo of the moon
Use Av (or A) mode.

Shooting Mode:

Select Aperture priority mode ('Av' on Canon or 'A' on other brands) using the mode dial of your camera. For practical purposes, as the moon is so far away, Depth of field is not hugely important here so you don't need a big f/number. Plus a smaller f/number will allow more light to pour into the lens allowing for a faster shutter speed. There is no need to go to your lens' extreme, though; something around an f/8 is usually sufficient.

By being in Av mode your camera will select the shutter speed for you. Even though you're using a tripod, shutter speed is more important than you think. The moon is actually moving quite quickly in the sky so long photos will therefore be less sharp, due to this movement. Quicker photos also help eliminate any camera shake or tripod wobble. Just note what shutter speed your camera is calculating for you. Something around 200th second is quick enough on a stable tripod. If it's quicker than that, great! But it doesn't need to be super fast. If the shutter speed is a little slow, just bump up the ISO a little.

ISO:

Since Aperture mode is selected, increasing the ISO will automatically increase the shutter speed. But don't just crank your ISO and get a super fast photo, because high ISO's create 'noise' in your photo and reduce image quality. Reducing noise wherever possible is important as we'll be cropping the image later on the computer. Keep your ISO as low as possible, but still make sure you're achieving a fast enough photo. Start on ISO 100 or 200 and see what shutter speed you're getting. If you're not getting a fast enough photo (ie your photo is blurry due to camera or moon movement), then bump up the ISO as needed.
under expose to bring out moon detail
Dial down exposure compensation to reveal detail.

The secret to a detailed moon – turn your exposure compensation DOWN!

If you leave your camera's exposure compensation on zero (where it normally is), in Evaluative metering, your camera will automatically try and give you a 'mid brightness' photo. Since the sky is dark and it takes up a lot of the frame, your camera will interpret the scene as 'dark' and therefore try to bump up the brightness a lot to generate that default 'mid brightness' photo. This means that the moon will be pure white, completely washed out and very over exposed. All detail on the surface will be completely lost. This is where a lot of people get frustrated, pack up and go inside. But just by turning your exposure compensation down (eg minus 3, 4 or minus 5) you're telling your camera that you don't actually want a mid-brightness photo anymore, you actually want a 'darker' photo, just like a shot of the night sky with a moon in it is supposed to look. You camera will adjust its settings (by tweaking the shutter speed) to give you a darker shot… revealing the detail in the moon! Result! Note that the longer your lens, the larger the moon will look in your shot and the brighter that photo is supposed to be (and the brighter you'll have to set your exposure compensation). The smaller the moon looks in your shot, the darker you'll need to set your exposure compensation to reveal it's detail. In short, play around with your minus exposure compensation until you achieve the detail you're after in the moon.

What if my camera's exposure compensation doesn't go low enough?

Some models of camera will only go down to a minus 2 exposure compensation. If your camera won't let you choose a really 'dark' photo (eg minus 5) you can still control your exposure, you just have to take complete control of your camera.

Using 'Manual' (M) mode, pick the same settings as above (a small-ish f/number and a fairly low ISO eg 200). Now you can just play around with your shutter speed making it faster and faster until you get the detail back in the moon. Start at something like 200th of a second. If the moon is too bright, make your photo faster (perhaps 300th second). By incrementally increasing the shutter speed you're letting less light into the camera, which makes the moon darker and brings back that detail. The opposite is also true.

That's pretty much it! Now just load your RAW files into a photo editing program, crop in on the sharpest image, perhaps play with the 'contrast' a little and you've got yourself an amazing moon photo! But by now you're no doubt hooked at photographing the night sky, so read on for some more things to try!
the moon is quite colourfull
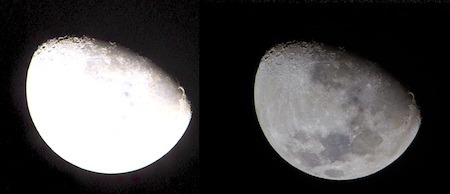
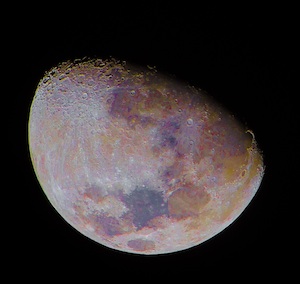
Saturation reveals the moon's colours!

Extension 1: See the colours of the moon, and stack exposures!

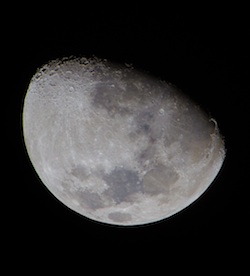
The moon isn't actually white. It's not even yellow. There are several minerals on the moon which each reflect sunlight in different ways. Just because our eyes do not pick up those subtle differences doesn't mean they don't exist. Your camera, unlike your eyes, can pick up the various colours of the moon, especially when saturation is enhanced in post processing afterwards.

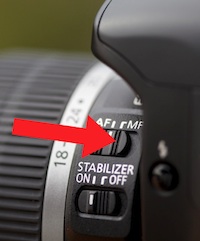
Revealing the colours of the moon is as simple as cranking up the saturation of the photo. This is sufficient, however any time saturation is greatly increased, noise also increases, reducing the quality. To help reduce noise, start with a high quality, noise-free photo by shooting on a low ISO as explained previously.

If you've got a program that can do it, it may also be possible to reduce the noise by 'stacking' several photos on top of each other (but you'll need to have taken several shots of the moon to do this, one after the other). If you're able to stack your images, it's better to enhance each individual image a little and stack them on top of each other, rather than just excessively enhancing a single photo.

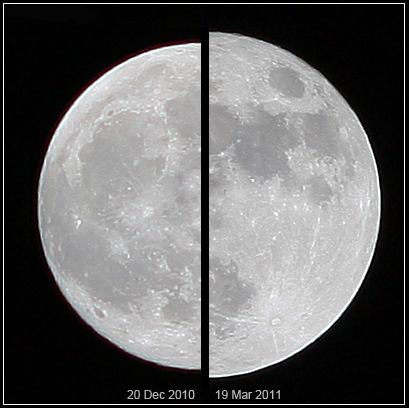
Not every photo editing software program can do this, but some can. I tend to use Adobe Lightroom for my photo editing, and for this I simply had to download a plugin called 'Enfuse' which is designed for averaging exposures of several photos of the same scene. This is often referred to as HDR, and allows average exposure to be achieved in both the bright and dark parts of an image by mixing three or more images of the same scene on top of each other. Enfuse (trial version) is available as a free plugin download, or simply make a small donation for access to the full plugin. www.photographers-toolbox.com/products/lrenfuse.php

Using Enfuse, simply select the images you want to combine, increase the saturation in them all a little and proceed to stack them on top of each other ensuring that the 'auto align' box is selected (this will make sure the different shots of the moon all line up correctly). You can then increase the saturation on the final image, slowly revealing the colours in a noise free fashion. If you'd like, you can repeat this process and then combine several of your final images into a single shot. Have a play around, it's good fun, and the results can be pretty impressive!
moon lit star trail
Star trail by moonlight.

Extension 2: Landscapes under moonlight.

Moonlight is an incredibly soft and even light, which can make for some interesting landscape shots, particularly when the moon isn't actually in the frame. Obviously moonlight is a lot less intense than sunlight, so you'll need to use a much longer shutter speed to achieve correct exposure than you would during daylight. The easiest way to achieve this is to flick your mode dial into Tv (or S) mode and just scroll the shutter speed to 30 seconds. Your camera will automatically select the f/number for you. Keep your ISO as low as is convenient, as high ISO's will create some noise in your photo. If your f/number is blinking at you, you'll need to bump up your ISO a bit. Assuming the f/number isn't blinking, you're good to go! If you want a brighter photo, just nudge your exposure compensation up a little until you achieve the brightness that you're after.

Quick tip:

By keeping your camera on a tripod and taking a series of photos continually, you can also use a program like Star Stax to create a star trail. Star trails under moonlight can make for creative results as the foreground remains evenly lit by the moon. Check out our Star trail photography tutorial for how to do this.
moon lit landscape
Landscape with moon in shot.

Including the moon in the photo.

Including the moon in a shot often leads to disappointment, not because it can't or shouldn't be done, but rather because we often have photographic expectations that can't be met. These expectations come from a couple of common misconceptions about photographing the moon.

We've all done it - the moon looks huge to our eyes when it's peeping over the horizon so we grab the camera and snap a shot, only to be disappointed that the moon looks so small in our photo. This is the trap psychologists term the 'moon illusion', one of the most famous of all illusions. Put simply, when the moon is on the horizon our minds interpret it to be larger than it really is, compared to when it is overhead, even though it is actually the same distance away. We also get disappointed when we see landscape photos which include the moon (with all its detail) as a huge circle in the scene. Most of those shots you see of the moon in a landscape photo are in fact composite shots. The photographer has blended together two photos - one photo of the landscape taken with a wide angle lens and another of the moon taken with a telephoto lens as described above. It's impossible to achieve the same result with a single image.

Landscape shots can still look great with a moon included, but just think of it more like a lightbulb. Your camera can't correctly expose for the dark foreground and the bright moon at the same time, so your moon will be likely overexposed. That's fine (in fact it can look great at times, especially when it's light is reflected over water) but just be aware you'll lose the detail on the moon's surface.

Quick tip:

If the photo is taken using a big f/number, it's possible to give the moon a 'starburst' effect. If you're getting this effect unknowingly and would prefer a more rounded moon you'll need to take a slightly quicker photo and use a smaller f/number.

Did you find this tutorial helpful?


If so, please click the 'G+' and Facebook 'Like' buttons below to help others find it, then enjoy other free tutorials here.

Thanks!


My Customers