How to photograph the Northern Lights Aurora | Chris Bray Photography

How to photograph the Northern Lights Aurora


how to photograph the northern lights

Capturing epic photos of these glowing curtains of light flowing across the night sky (if the Aurora is present) isn't actually very hard and the results are often even more spectacular than what you can see with your naked eye. So if you're heading somewhere like Norway, Alaska or some other high-latitude location in winter with a chance to see the Northern Lights, it's worth trying to photograph!

What you need:
  • Camera & wide-angle lens
  • Tripod
  • An Aurora & clear skies

1) How do you know if the Northern Lights / Aurora will appear?

southern lights aurora borealis
Northern Lights
Latest Prediction


The Northern Lights / Aurora is present year-round, but its intensity varies greatly, not only from day to day, but even minute to minute, and you also need good clear, dark skies to see it well. It's a phenomenon linked to solar activity interacting with the Earth's magnetic field and some locations on Earth are much more likely to put on a spectacular display than others, and it's generally confined to the arctic or near-arctic latitudes. Popular Aurora Borealis (Northern Lights) hotspots include arctic Norway (such as Tromso), Alaska (such as Fairbanks)etc. The same phenomenon also occurs down south in Antarctica, where it's called the Aurora Australis, and can sometimes be viewed as far north as Tasmania.

The likely intensity of an Aurora on a given night can be predicted a few days before and there are many websites and online groups that provide public, free aurora forecasts which is an invaluable tool for helping decide if you're going to bother going out to look and photograph it.

Aurora Forecasts
southern lights aurora borealis
Southern Lights
Latest Prediction


And of course even if a strong aurora is predicted, to get a good view or photograph of it you need a clear, dark night sky without too many clouds. Check your local weather predictions for clear skies. It's also best if the moon is either not in the sky at the time, or isn't very big. A bright full moon will create so much light pollution that even a great Aurora might look dull.

2) Finding a good photo location

aurora composition


So an aurora is predicted in your area, the skies are clear, the moon is hiding and you're going to try and take a photo of the northern lights! Great! The less ambient light there is around (glow from other light sources ie cities, the moon etc), the brighter the aurora will look, so try and think of places out of town if possible, or at least away from bright lights.

In terms of composition, reflections of the Aurora in a body of water like a lake can make for amazing photos, so maybe use Google Earth to look around for some alpine lake or something. Some foreground framing can be nice too, some pine trees or maybe the edge of the lake can form a leading line entering the corner of your shot etc. Take a look at my video on photography composition for some extra tips.

Don't worry too much if the aurora doesn't look very strong to your eyes, it might look much better in the photo!

3) Setting up your camera


1) Wide Lens: Put a wide-angle lens on your camera, ideally one that can go as wide as perhaps 16mm (for a full frame camera), or 10mm or 8mm for crop-sensors. Or, just the widest you have. Just like photographing star trails, the light is faint and it helps if your lens can open up to a nice big aperture (ie a small f/#) to let lots of light in. f/2.8 is awesome, f/4 is still fine.

2) Tripod: Find a nice composition and then attach your camera to a tripod to hold it in that location. Make sure the camera is horizontal, it's easy to shoot wonky photos at night.

manual focus
3) MF Focus: It'll likely be too dark to have your camera try and auto-focus on your scene for each shot, so you're going to have to put your lens into Manual Focus. Rather than then try and guess the right focus, a good trick can be to point your camera at something in the distance that's bright enough for the Auto Focus to see, such as a bright star, distant building light, moon etc and then with your lens still set to Auto Focus (AF), half-press the shutter button on your camera to get it to try and Auto Focus onto it. If your camera eventually manages to AF on it (ie 'beeps' and goes green or whatever, and it doesn't matter if it takes a few attempts) then, now that the focus is perfect, switch the focus now to Manual Focus (MF) (the switch is often on the side of the lens), and now as long as you don't bump the focus ring on your lens, it will stay nicely pre-focused from now on and you won't need to worry about trying to manual focus or re-focus each time! If there's nothing bright enough to focus on, then instead many lenses have a focus-distance display on the barrel of the lens itself. In this case, put the lens into MF and then twist the focus ring until it's set to infinity.

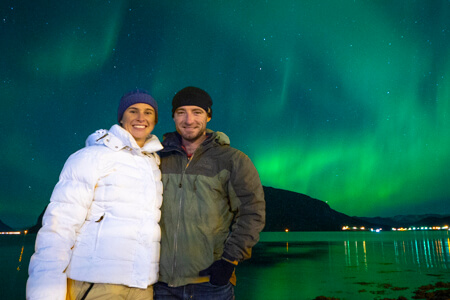
If you have a subject close to the camera in your scene, ie a person standing there, then it's probably best to focus on them rather than the Aurora, because you'll be able to see if your subject looks blurry more than if the aurora is a bit soft in the background. You'll be likely using a small f/# to let the light in, which can tend to give you a small depth of field exacerbating this problem, but wide angle lenses tend to give you quite a deep depth of field anyway, so you'll be fine.

manual mode
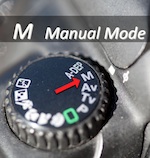
4) Manual Mode: Set your camera to Manual Mode - it's actually easier this way.

5) Set a small f/#: Dial your f/# down as small as it will go (ie f/4 or even f/2.8 if it'll go that small). This opens up a large aperture hole allowing as much light as possible.

6) Set your ISO to 1600: The Aurora is often pretty faint and you're going to have to crank up your ISO as high as you're willing to to get a bright enough result. It's a balance: if you turn your ISO up too high then your shot starts to loose quality and becomes grainy / gritty from 'ISO Noise', but if you have your ISO set too low, then the aurora will be too faint. The exact ISO value to use depends on how bright the aurora is, how good your camera is with high ISO's and how much ISO noise you're willing to accept in your photo. A good starting point is ISO 1600, and you'll adjust from there.

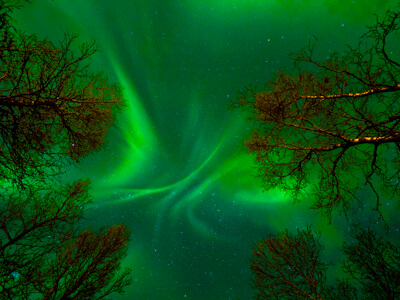
7) Shutter Speed 10-20 seconds: The Aurora actually moves surprisingly fast and so if your shutter speed is too slow, the aurora will actually look like a soft, blurry smear, loosing all the interesting patterns and waves in the curtain effect. The faster the shutter speed, the crisper your Aurora will look, but the darker it will be (or, the higher you'd have to turn your ISO up to brighten it back up). 30 seconds is getting a bit slow, so I like to start at 20 seconds, and adjust faster from there if possible, to maybe 10 seconds is great if it's a bright aurora.

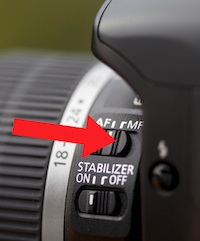
8) Turn OFF stabilising & use 2-sec delay: Not only is it just wasting battery as your camera is already nice and steady on a tripod, but many lens stabilisation systems actually create camera shake / wobble / blur if the camera is held steady and stabilisation is left on. So turn it off - the switch is often on the side of your lens and called 'OS', 'IS' or similar. Then, so that you're not wobbling your camera each time you press the button to take a photo, either plug in a remote control, or more easily, change the 'Drive Mode' setting to the 10-second self-timer countdown delay (or better yet, the 2 second delay if it has that). This lets the camera settle down and become perfectly steady before it takes the photo.

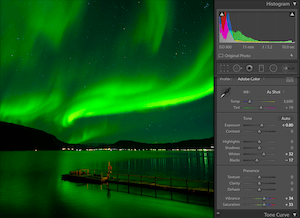
9) Raw mode: Ideally shoot in RAW mode (not jpg) to allow you more ability to post-process the image later, including being able to tweak the white-balance later to give you correct colours. If you really want to shoot in jpg because you're not going to do any post-production, then setting your white balance can become important - if 'Auto White balance' is giving you weird colours, set your white balance manually to somewhere between 3500 and 4000 K in your camera's menu.

10) Take a test photo! Then see below for how to start improving...

4) Trouble-shooting

northern lights


It wouldn't take the photo? Probably your camera is still on Auto-Focus and it couldn't find anything to focus on in the dark, so it didn't let you take the photo. Put it on Manual Focus, MF. See above for focusing technique.

It took a long time to take the photo? 20 seconds can seem a long time, but if after that the camera still seemed to be busy for ages, then it's probably doing what's called 'long exposure noise reduction' which is trying to make the photo less grainy, but I'd suggest you find that in a menu and turn it off to save time, especially if you're looking at making a time-lapse video from a series of back-to-back aurora photos.

Weird colours? Colours are determined by your white balance setting (WB), if you're shooting in RAW then it doesn't matter as you can correct that in post production, but if jpg, then set your white balance manually to somewhere between 3500 and 4000 K in your camera's menu.

The photo looks too dark? Either turn up your ISO and try again, or make the shutter speed longer if you really have to. You'll be able to do a fair bit of brightening later in photoshop/lightroom so it doesn't have to look super bright on the back of your camera.

The photo is plenty bright enough? Great! That means you can now turn down your ISO a bit to get a higher-quality photo. It'd be nice if you could get your ISO down to around 800 or even 400... and if the Aurora still looks plenty bright enough at ISO 800 or 400, then start to reduce your shutter speed from 20 ideally down to 10 seconds to get crisper Aurora detail.

5) Post Processing

post process northern light photo


You'll be able to enhance your Aurora shots quite a lot in post-production by adding a bit of extra saturation & vibrance, lifting the exposure a bit, darkening the blacks and brightening the whites. You can also tweak your white balance settings to get a more realistic colour if you like.

Extra: Make a time-lapse video!


What's cooler than one awesome Northern Light photo? A whole stack of them taken one after the other, combined into a time-lapse video where you can see the amazing curtains of light wave and flow across the sky! We have a dedicated tutorial here for shooting time-lapse videos, but it's super easy - you basically just keep taking photos one after the other (either with a remote, or maybe your camera has an inbuilt intervalometer or time-lapse mode, or just hold the shutter button in with a rubber-band and the drive-mode set to 'continuous', and then use a free program to combine into a cool video!

Extra 2: Fill-flash in a subject

aurora fill flash person


Using all the same settings, if you have a person standing in your photo, you can light them up with either turning on your camera's inbuilt flash (if it has one, it'll have a little flash button on the side somewhere to make it spring up), or using an external flash, or even just briefly waving a torch onto the person during the photo, to paint them in. As mentioned, it might be best to re-focus the camera onto the subject rather than the distant aurora.

Did you find this tutorial helpful?

photo tours


Then you'll probably love my free photography course, a ten-part video series online, covering everything from composition and exposure compensation through ISO, shutter speed and aperture to lenses and lighting! Check it out here!

To learn even more, we run small-group wildlife and landscape photo tours around Australia and the world, taking you to the best places on Earth at the best time of day - without the crowds - and with friendly, professional photographers there to help YOU get the best photos. These trips are an amazing way to improve your photography and have an incredible holiday at the same time. We'd love to share some of our favourite places with you, so hopefully we'll meet up on a tour soon. Take a look at some of our amazing photo tour destinations!

My Customers