Raw vs Jpg Difference | Chris Bray Photography
chris bray
Tutorial by Chris Bray

RAW vs JPG Difference


Should I be shooting in raw or jpg, and what's the difference anyway? It's a VERY COMMON and VERY IMPORTANT question we're asked at our courses and safaris. Many people shoot raw when they shouldn't, and others could enjoy better photos if they did. The correct answer for you depends on several factors and to make the right decision, you need to know some basic differences – they can be super technical, but I've simplified things here to get you on your way.

For this tutorial we'll start with some general differences and then move on to examine just how much better raw files actually are, using some examples I took with my Canon EOS-1D X set to save both raw and jpg simultaneously, so my comparison photos are identical. The choice of saving your photos as jpg, raw (or both) is usually set inside your camera's menu settings, often labeled 'Quality'. Jpg's have the filename extension .jpg, and the filename extension for raws is brand dependent (.cr2 for Canon, .nef for Nikon etc).

The most important thing to realise is

that inside your camera, all photos basically start life as raw files, even in a compact camera. A raw file is simply the raw, unedited data collected by the camera's sensor. It's not really even an image file yet – just a matrix of numbers. Different brands and models save this info differently, and it needs to be decoded (using software such as Photoshop, Lightroom etc) before you can even visualise it. A photographer would then carefully adjust things like colours, brightness, sharpness, noise-reduction etc to enhance the image. From this edited raw file, the photographer would then create and save an image file (usually a .jpg, but sometimes a .tiff for super quality) which can finally then be printed or shared online.

If you've set your camera to save your photos as jpg's

, then your camera does all that decoding and adjusting for you, creating ready-to-use image files which (if set to the highest size and quality) can be perfectly good enough for most end uses - even selling to a magazine. The jpg has exactly the same resolution (number of pixels) as the raw file. Its automated adjustments (partly based on your selected 'picture style' and 'white balance' but also includes adjustments to brightness, sharpness, blacks, noise-reduction etc) save you having to manually decode and tweak each image yourself, and the results often look great!

The thing is, with a raw file

, you have the ability to get quite a lot more from your images – but only if you're prepared to work for it. Things like pulling back detail otherwise lost in the blown-out highlights in the sky, lifting out details from dark shadows, correcting exposure, getting the colours right, and simply doing a better job at precisely controlling the amount of sharpness, or noise reduction etc that each image actually needs are all possible, resulting in a higher quality photo. Yes you can tweak and adjust a jpg file too, but not to the same extent. Later on in this tutorial I'll show you just how much you can pull out of a raw file!

Physical differences and ramifications:

RAW files:

  • Are just a bunch of numbers that have to be decoded (and usually tweaked) to create an image file that can then be printed, put online etc.
  • Have a large file size. There is no compression, so no data is lost, and an 18 megapixel camera will generate at least an 18 megabyte or larger raw file.
  • Being larger files, you can't fit as many on your memory card and you'll soon find you have external hard drives coming out your ears at home. You may also find that you can't take as many photos in quick succession (ie not as large a burst on 'continuous drive mode') before the camera's internal buffer fills up and you have to wait for the huge raw files to be copied to the memory card before you can shoot again. Of course shooting in both raw and jpg together makes these problems even worse!
  • Have no adjustments made to them, so initially they often appear drab, dull and dark compared to the automatically tweaked jpg file - but of course the point is that you'll then tweak it yourself on a computer and hopefully do an even better job at creating a jpg that surpasses any automatically generated one.
  • Are basically read-only – you can't save changes to a raw file. This is why they can be requested as proof that the photo is real, like a 'digital negative' for strict photography competitions, or even in a court of law. Some programs appear to let you 'save' edits to a raw file, but these are actually only saving a list of adjustments to a little sidecar file that is linked to the raw file which itself remains unedited.
  • Have a much higher colour 'bit-depth' recording at least 4,000 times more colour separation than a jpg file. It's complex, but common DSLRs use either 12, 14 or even 16 bits of data to save each colour channel (red, green and blue) in your raw file. Even picking the lowest 12-bit versions, that corresponds to 4,096 levels of luminance per colour, and when multiplied together (combining red, green and blue) gives raw files the ability to save a whopping 68.7 billion different colours, at least! Jpg's on the other hand are 8-bit (though there's talk of the introduction of 12-bit in the future) which corresponds to only 16.7 million possible colours. That's still heaps, and considering as the human eye can only distinguish about 7 to 10 million colours, there's an argument that even jpg's provide more colour depth than is needed. However, when it comes to editing your images, the extra colour definition that raw files enjoy gives you a huge advantage.

JPG files:

  • Are image files, ready to be printed, put online etc.
  • Have a smaller file size – anywhere from half to even a fifth of the size of a raw file. This is because jpg's are saved using a compression algorithm that basically throws away info to make the file size smaller. You can usually set how heavily to compress the file: very high compression gives wonderfully small files but visibly poor quality, and low compression (known as 'fine' or 'high quality' settings - always use this) still throws away information but usually in a way that is hardly noticeable and the image remains very high quality. That 'un-noticeable info' (such as details in the shadows) is gone though, and you can't get it back by tweaking your photo later.
  • Being smaller files, you can fit many more photos on your memory card, they won't fill up your computer hard drives so quickly, and you can likely take many more photos in quick succession before the camera's internal buffer fills up and starts to choke.
  • Lose a little more information every time they are edited and re-saved.
  • Have a lower colour 'bit-depth', distinguishing only 16.7 million colours, as opposed to the 68.7 billion (or more) of a raw file. As explained above, this doesn't matter much, until you start trying to post-process your images, then you'll find there's just less information there to work with.

When should you shoot in JPG?

  • If you have no desire or ability to post-process the images yourself on a computer, or find that you're happy enough with the (limited) amount of post-processing you can do to a jpg file. Remember you HAVE to post-process a raw file before you can even use it.
  • If you have limited space available on your memory card or need to take many hundreds of photos in a row, such as creating a time-lapse set.
  • When you need to be able to use (or share) the images right away.
  • When you need to be able to fire off a long burst of photos in quick succession (i.e. in 'continuous shooting' drive mode) without the camera's internal buffer choking up and stalling. Mind you, modern higher-end cameras equipped with fast memory cards can still rattle off an amazing number of raw photos before stalling. My Canon EOS-1D X can shoot 32 raw files one after another (at 14 frames per second!) before stalling (64 in a row for jpg's, and only 16 raw + jpg's together).

When should you shoot in RAW?

  • If you have the time, ability, desire and software to enable you to post-process the photos yourself on your computer (using a program like Photoshop, Lightroom, Aperture etc) in order to get the highest possible quality results from your photography. The extra quality you can get in your final image may well be worth the time spent tweaking. It's up to you.
  • If you have plenty of space on your memory card (raw files take up anywhere from 2 to 5 times more space).
  • If you're shooting situations where there is a large dynamic range (i.e. the scene contains very bright areas and very dark areas, such as outdoors) then it's handy to have the ability to pull back the highlights and lift out the shadows in post-production later on.
  • If it's critical that you don't mess up the shot – raw files are far more forgiving in terms of accidentally under or over exposing the photo. It's quite amazing how much you can fix things later in a raw file – almost +/- 2 stops of incorrect exposure!

When should you shoot in both JPG and RAW?

  • If you're just starting to experiment with raw, and want to play around with post-processing, but retain the usability of the fallback jpg's too.
  • If you usually shoot raw but have a need to share or display the images with other people before you have a chance to post-process your raws.
  • If you usually shoot jpg but happen to be photographing something exceptional that you think you may one day want to enter into a prestigious photography competition or prove to someone that it's not a fake! Note that even the very elite "Wildlife Photographer of the Year" competition permits "original jpg's as shot by the camera" as adequate proof if you don't have a raw file - but you must at least keep a copy of the un-edited jpg.
  • Apart from these situations, avoid shooting both jpg and raw – it's just a waste of space!

Visual comparisons of RAW vs JPG


raw vs jpg

Straight out of the camera and placed side by side

as (above), the most obvious thing we notice is the RAW file (above left) is a lot duller than the JPG (above right). This often leads to confusion, with people mistakenly saying “My jpg's are better than my raw files!” This is to be expected though, because you've not post-processed your raw file yet – the jpg only looks good because it's been automatically tweaked in the camera, adding brightness, blacks, saturation, sharpening, colour-adjusting, noise reduction and more! If you wanted, you could do exactly the same edits to the raw file yourself and make it look exactly like the jpg. Ideally though, you'd actually tweak the raw file to give exactly the look we want – better (or more accurately) representing the scene we photographed. The exact tweaks/edits required would be different for each photo, and as you'll see later, you can get more detail from a raw by carefully doing adjustments, rather than letting the camera slap on its own.

Fixing incorrect exposure in RAW vs JPG files:


One of the amazing abilities of a raw file

is just how much extra information is hiding in the shadows (and to a lesser extent, the highlights) of the photo, enabling you to recover a photo that you accidentally over or under exposed. Let's work from the below set of seven different raw photos (I saved jpg versions also), ranging from -3 stops underexposed (below left) through correct exposure (below middle) and +3 stops overexposed (below right).

range of exposures

Fixing underexposed images:

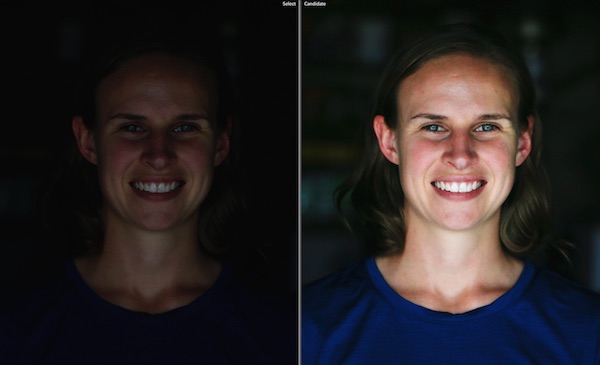
Let's see how well we can save the underexposed images (the left ones above) in post-production, by lifting the exposure. Below we can see the raw file that was originally underexposed by 3 stops (below left) compared to how well we've managed to recover it in post-production by increasing its exposure by 3 stops (below right):

fixing underexposed raw file

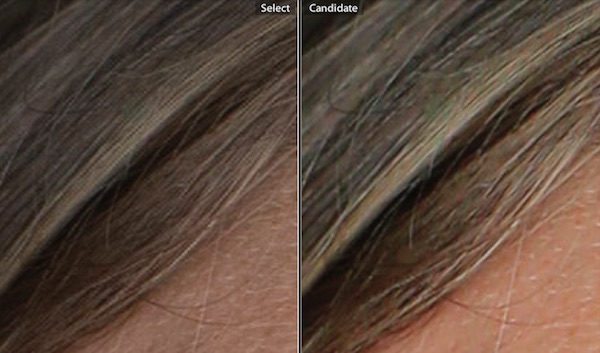
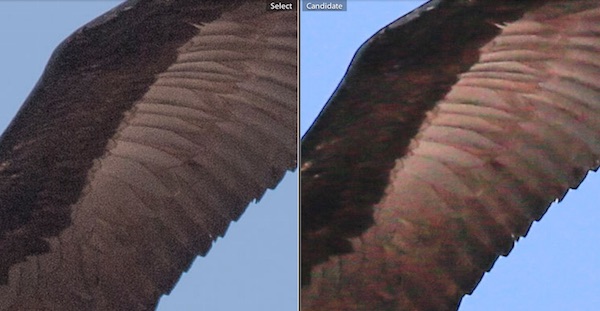
Amazing! In this case, we're able to recover an image that was underexposed by a whopping 3 stops (though I'd usually say you're only safe to recover from -2 underexposed - it does depend on the scene). As we can see below, the 'recovered' raw image (below right) has a little extra noise in it than the one that was taken correctly (below left), but this noise too can be reduced in post-production to some extent.

noise on raw file

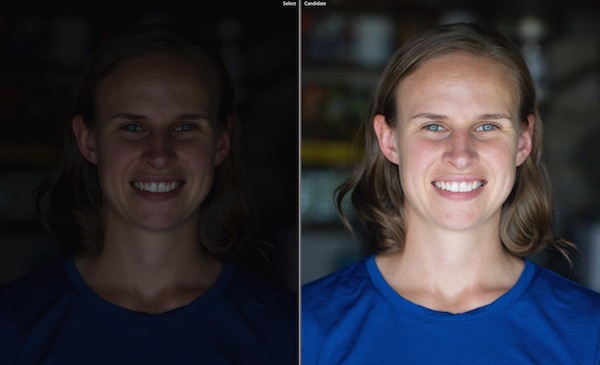
Now for jpg - lets see how well we can recover a -3 stops underexposed jpg file (below left) by adding +3 exposure in Lightroom (result below right). Nothing like as recoverable.

fixing underexposed jpg

Fixing overexposed images:

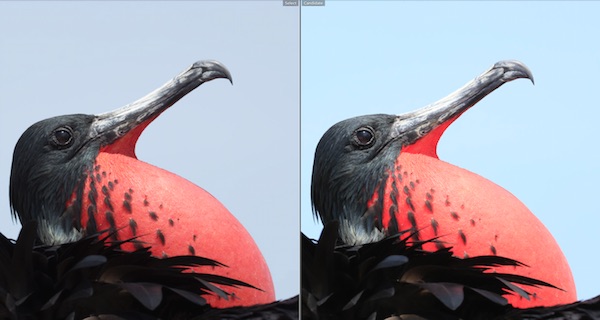
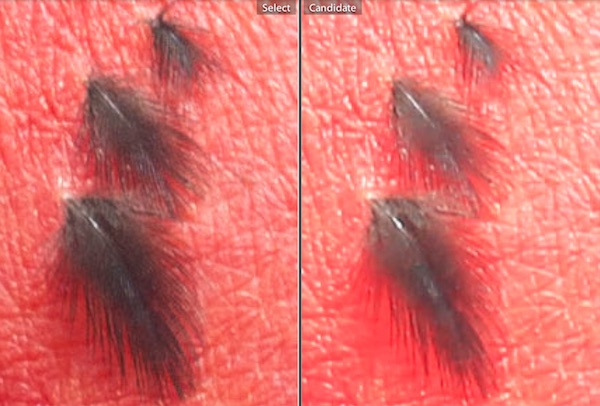
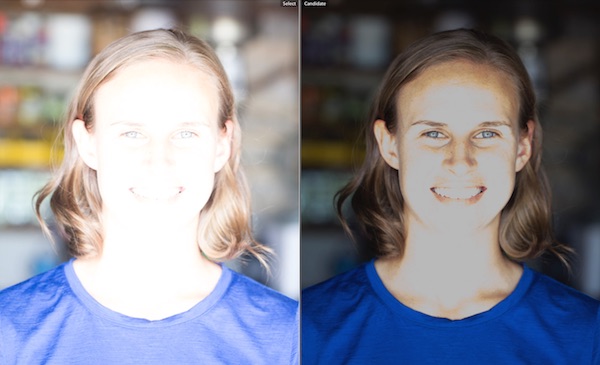
Overexposed images are also recoverable, although not to the same extent as underexposed ones, perhaps to somewhere between +1 and +2 overexposed. This is basically because once a certain threshold brightness in the scene is saved as 'white' (ie fully maxed-out in terms of brightness) in the image (be it raw or jpg), anything that should be brighter than this in the scene can still only be saved as 'white', and so we say that anything brighter than that threshold becomes 'clipped' – it's all saved as the same thing - 'white'. So, even if we try and darken the photo later on in post-production, there is no way to separate out the areas that have become 'clipped', and you're left with patches with no detail. You can see this below, where we have the raw photo that was shot +3 overexposed (below left) and our 'attempted recovery' of it (below right) where I've dropped the exposure by 3 stops in post-production. No good. Later you can see a fairly successful recovery of a +2 overexposed raw file though.

fixing overexposed raw file

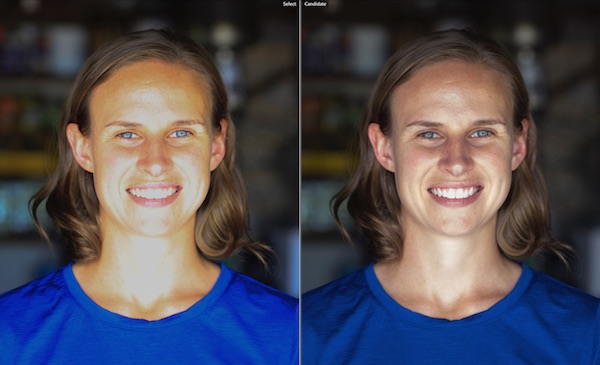
Recovering overexposed jpg files is even harder. In my examples, +3 overexposed jpg was entirely useless, so instead let's compare an attempted recovery of a +2 overexposed jpg (below left), beside a fairly successful recovery of a +2 overexposed raw file (below right). Not only are the effects of 'clipping' visible in the jpg, but the colours are also terrible, due to the lack of tonal range saved by jpg files. The raw file though, is almost usable.

raw vs jpg for overexposed

TIP

This is why it's generally safer to underexpose rather than overexpose your photos, especially if there's a lot of brightness range you'd like to try and recover later.

Better detail in RAW vs JPG:


While the number of pixels (i.e. resolution) is the same

between a raw and jpg file, even before we start editing to try and lift out extra details, the effects of the automatically applied adjustments to the jpg, as well as the effects of file compression (even when the lowest compression / highest quality jpg is selected) has already made a discernible difference in the detail present in the image. Zooming in, we can certainly see finer details in her hair in the unedited raw file (below left) compared to the jpg (below right).

detail in raw vs jpg

And moving on to another example, lets look at a this shot of male Frigatebird in the Galapagos. As always, the unedited raw (below left) looks duller than the jpg (below right) because it's yet to be tweaked:

jpg file looks better colours raw looks dull at first

Zooming in though, we can easily see the extra feather detail present in the unedited raw (below left) compared to the jpg (below right).

raw file has more detail

Improving photos with high dynamic (brightness) range:


The exposure correction examples we looked at give you some idea of how much extra information is hiding in the shadows (and less so, the highlights) of raw files compared to jpg files. This 'hidden data' is not only useful for fixing incorrect exposure, but also for greatly improving correctly exposed photos that have high dynamic (brightness) range, to reveal the detail in the otherwise seemingly blown-out highlights (i.e. in the clouds) and/or lifting out the details seemingly lost in the dark shadows caused by harsh sunlight.

Here's a classic example of high dynamic range, a bird in flight. Again, the unedited raw (below left) looks duller than the jpg (below right) because it's yet to be tweaked:

jpg vs raw bird

But lets look what happens when we start to tweak both files to try and lift out the details in the shaded underside of the wings. Lifting the shadows by +0.8 in Lightroom for example, we can clearly see that (although slightly noisier, which can be somewhat fixed later too) there is much more detail in the tweaked raw file (below left) compared to the tweaked jpg file (below right):

detail in shadows in raw vs jpg

One last example, take a look at the unedited raw example (below left) of the hut we take guests to on the Amazon, and how much detail we can reveal from the shadows (below right) in post processing. You could get part way there with a jpg, but not to this extent, and we'd lose a lot more detail too.

more detail in shadows in raw over jpeg

In Summary:

You can get a lot more detail, and recover a poorly exposed raw file a lot more than you can a jpg, but to gain any of these advantages, you do need to put some work into post-processing, as well as cope with the drawbacks of using and storing such large, slow files.

As general advice though, I think if you're a photographer who's just starting out, you probably should just shoot jpg. When you eventually want to get more out of your images (perhaps quite quickly), then start learning how to post-process your jpg's - this alone will give you a huge boost. If you then progress to the point of wishing you could get even more from your images, then this is a good time to start shooting raw + jpg for a while, to experiment and compare the benefits and weigh them up against the drawbacks. If you then, like me, become hooked on getting the very best possible results from your camera, then, swap to raw and you'll never look back.

I hope this tutorial has helped demystify the jpg vs raw debate for you. Again, I have simplified things here and there, and there are always arguments to the contrary, and I'm more than happy to hear your views if you feel I should change something.

Did you find this tutorial helpful?


If so, please click the 'G+' and Facebook 'Like' buttons below to help others find it, then enjoy other free tutorials here.

Thanks!


My Customers