Top 5 Photo Questions | Chris Bray Photography

5 Most-Asked Photography Questions


how to photograph waterfalls

We're lucky enough to help all kinds of people take all kinds of photos, with all kinds of cameras, in all kinds of places around the world - but the same five questions always keep popping up again and again. They're really important questions though, so for Christmas I've decided to write and share my answers to each. Enjoy!

Top 5 Photography Questions:
  • 1) "What should my ISO be on?"
  • 2) "My photo doesn't look sharp, why?"
  • 3) "How do I know if it's correctly exposed?"
  • 4) "What f/# should I be using?"
  • 5) "Should I swap from DSLR to mirrorless?"

1) "What should my ISO be on?"

what iso


As low as you can get it while still getting a fast-enough shutter speed. The higher your ISO, the more ISO ‘noise' (colourful speckles) will deteriorate the overall quality of your image. This noise can be smoothed over in post-production to some extent later, but it's always best to shoot with the lowest ISO you can get away with in any given situation. If your ISO is too low though, you'll require longer, slower shutter speeds to get correct exposure, and you risk ending up with movement blur – either from camera shake, subject movement or both – and this is impossible to fix later, so I'd actually suggest that having your ISO a touch too high is safer than too low.

Exactly what shutter speed you need to ‘freeze' a given subject depends on how fast it's moving: a bird in flight might need 1/2000th sec but for a walking person or an elephant perhaps only 1/250th will still look fine. The short answer is if your photo has movement blur, then turn your ISO up. Unless you like the movement, of course! Panning photos and the like can look great. Finally, if you're shooting in S (Tv) mode, then auto-ISO is quite a handy tool. It'll only crank the ISO just high enough to give you the shutter speed you've dialled in. However, remember that it's not so good in Aperture (Av or A) mode.

2) "My photo doesn't look sharp, why?"


A photo can be blurry for one of six main reasons:
bad focus

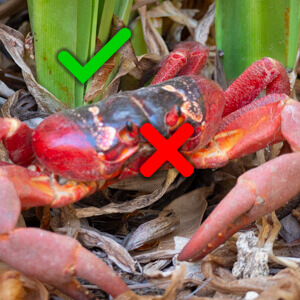
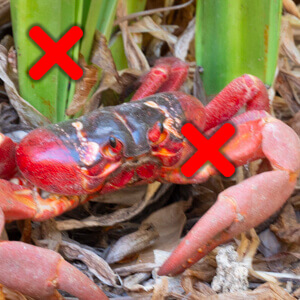
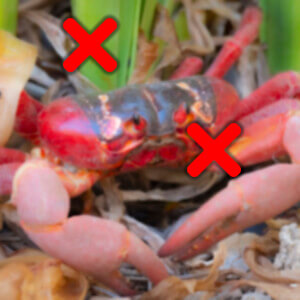
FOCUS: Your subject might actually not be in focus because the camera focused on the wrong thing. If your subject looks a bit blurry, look around in the photo to see if something else in the shot is actually sharp; perhaps the branches behind the bird, the water behind the whale, or the shoulder rather than the eyes of the lion. If so, then you need to get better at focusing. Use a single, small AF point and be sure it's right on your subject when you focus. If the subject is moving towards or away from you, consider using continuous auto focus (AF-C) or tracking focus so that the focus updates as the subject's distance changes. If the subject is basically stationary, then I usually recommend single auto focus (AF-S).

movement blur
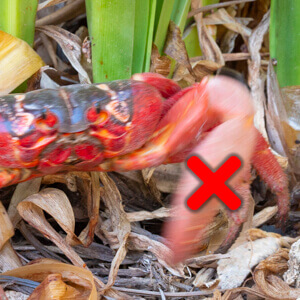
SUBJECT MOVEMENT: Your subject might be moving too fast for your shutter speed. If your subject moves while the shutter is open, soaking up the image, then you're going to end up with movement blur. Use a faster shutter speed. Often this movement blur obvious and you can even see the direction of the streaky movement in just the wings perhaps. It can sometimes be hard to tell apart from just a focus issue but a dead giveaway can be to take a look at what shutter speed was used. There is no way, for example, you can expect to freeze a bird in flight at 1/50th second! For a stationary bird on a branch, maybe as slow as 1/50th will look okay but you do then start to risk the next kind of problem, which is camera shake.

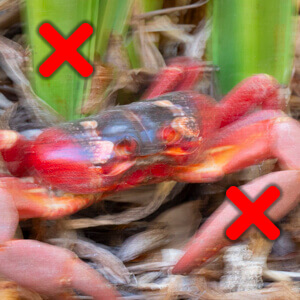
CAMERA SHAKE: You're not holding the camera steady enough for your shutter speed. Just like with a moving subject, if you're wobbling
camera shake
the whole camera around while the photo is being captured, unless your shutter speed is fast enough, the whole image is going to suffer movement blur. Unlike subject movement blur, camera shake will affect the entire image. There are a few things you can do to try and remedy this issue. Ensure the stabilising mode on the side of your lens is switched to ON. Use a faster shutter speed because the longer your lens (the more you've zoomed in), the worse camera shake becomes and the faster shutter speed you need to avoid it. A good rule of thumb can be to avoid shooting shutter speeds slower than 1/focal length (i.e. 1/100th sec for 100mm lens is about as slow as you can reliably hand hold), and use a rest like a bean-bag or tripod. Weirdly though, you can still get camera shake effects on a tripod sometimes, no matter how steady it is. See the next point for more.
stabilizer blur

STABILISER-INDUCED SHAKE WHEN ON TRIPOD: Strangely, many stabilising systems freak out a little if the camera is incredibly steady and it can't find any vibration to correct for, such as when the camera is on a tripod. This can result stabilising system creating movement and softening your image. If you're leaving your camera on a tripod to take long, slow exposure such as landscapes, waterfalls or stars, turn the stabilising off. If your camera's steady anyway, you don't need the stabiliser, it's just wasting battery and it might be creating unwanted movement blur. This only seems to happen with some lenses, and I didn't believe this was really a thing until I saw it, and tested it several times. It's very real!

POOR QUALITY LENS FILTER: Poor quality UV filters, lens protectors, polarising filters and so on can really soften your image. I
filter blur
always start each photo tour off by encouraging each guest to take the same test photo with and without their UV filter / lens protector attached (if they're using one). They can then review their photo on the back of the camera, zooming right in and flicking between the two shots and decide if they're happy with the quality loss. There should be no quality loss for a good filter. You get what you pay for but be aware that even high-end brands like Hoya offer a range of quality from entry-level up to pro. Great filters are expensive but there's no point paying thousands of dollars for a pin-sharp lens and then ruining it by putting a $20 filter across the front. But equally, it's worth protecting the front of an expensive lens, so get a good filter. If it's a cheap lens, then get a cheap filter.

MAYBE IT ACTUALLY IS SHARP, CHECK IT ON A COMPUTER: There can be a few common traps when trying to decide if a photo is sharp or not by reviewing it on the back of the camera. Some cameras let you digitally zoom in to the photo beyond 1:1 pixel zoom level, to the point where you're starting to magnify individual pixels. Unsurprisingly the image starts to look blocky and lacking in fine detail, where as in actual fact, it's
good
perfect. If you can, turn off this feature in the camera's menu. The other issue can be if you're just shooting RAW and reviewing on the camera. Some cameras (including the GH5) don't save a full-resolution JPG preview file inside their RAW files and it's always this JPG preview ‘inside the raw file' that is shown when you review a RAW photo on a camera. This means that when reviewing a RAW image on some cameras, if you zoom right in, the image might start to look blocky and lacking in fine detail – just for the last couple of zoom-intervals – but again, when you look at the image later on a computer, bingo, all the fine detail is there after all and the image is pin sharp. If you need reassurance out in the field, you can shoot both RAW and JPG together (then when reviewing, it will show you the full-resolution JPG) or you can often tell the camera to create a full-resolution JPG from a selected RAW file, and you can check that instead.

galapagos photo tour

3) "How do I know if it's correctly exposed?"


Basically for a typical photo, you want it to be as bright as possible without quite blowing out the highlights, so the brightest parts are almost - but not quite - white. It can be hard to tell just by looking at a screen, so spend five minutes and learn to understand histograms.

Histograms are super easy and at glance allow you to accurately see if you’re starting to get any pure white in the bright areas (which means you’re losing detail). If the shape in your histogram graph reaches the far right-end of the graph, then that means your image has some white in it. The higher the spike on the right-end of the graph, the more white is in your photo and the more detail you've lost. Ideally you don't even want a small spike rising hard-up against that extreme right-hand end of the histogram - if you do, dial your Exposure Compensation (EC) back a little more negative and try again - it should shift the shape in the histogram to the left, ie darker, with less blown-out white, until you only have a tiny bit (or ideally no) white left. Don't go darker than you need to though as the rest of your photo will then start to get too dark, or even black (a spike rising on the extreme left side of the histogram graph). One of the joys of a mirrorless system is that you can see your exposure in real-time through the viewfinder.
histogram blown out
Blown-out details show as a spike
on the right of the histogram.
You can even have a little histogram graph in the corner the whole time and be constantly tweaking your EC for every tiny shift in lighting/clouds, so that when you take the shot the exposure is already perfect.

Of course, some photos are supposed to be dark and aren’t meant to have any bright areas while others should have lots of white in them, and in really contrasty, bright sunlight you often can’t help but end up with both extremes in the one shot. Generally speaking, you want your images nice and bright but not overexposed – not blowing out the highlights if you can help it.
kenya photo tour elephants

4) "What f/# should I be using?"


The f/# represents the size of the aperture in the lens, which controls the Depth of Field, which is how far in front and behind of where you actually focused will also look sharp in your photo. It’s super easy: the bigger the f/# you use, then the bigger the Depth of Field will be, the more stuff in focus; the smaller the f/#, the smaller the Depth of Field, the less stuff in focus! If you’re shooting a landscape or a scene where you want everything to be in focus from the close-up plants to the distant mountains, then you need a big Depth of Field and should you use a big f/# like f/18. If you’re shooting a single subject like a wildlife portrait, then you probably want a small Depth of Field. The smallest f/# your lens can give you, like f/4 is great, helping only your subject be sharp and make anything in the foreground or background soft and blurry which really helps make your subject stand out. If there’s a couple of subjects in the same shot and you want them all to be sharp – perhaps two animals interacting – then maybe you need to scroll up your f/# a bit to ensure both come out in focus. Generally for wildlife though, the smallest possible f/# is what you use 90% of the time. Not only do blurry backgrounds look great but small f/#’s correspond to large aperture holes, which means lots of light can get into your camera quickly, allowing nice fast shutter speeds without having to crank your ISO too high. Perfect!
chris bray

5) "Should I swap from DSLR to mirrorless?"


Yes, probably, and sooner rather than later, while it’s still worth something! Ha-ha. But seriously. I think the only question is do you go full-frame mirrorless or micro-four thirds mirrorless. And, don't make the mistake of assuming that full-frame is necessarily better - it depends on what you're doing. Sub-frame has huge advantages in smaller, lighter, cheaper (but just as high quality) lenses and makes all your lenses seem much longer, so a micro-four thirds system for example, doubles the effective focal length of the lens, so a 100-400mm lens behaves as a whopping 200-800mm which is epic for wildlife and sports etc. The trade-off is either less megapixels (but do you really need more than 20 megapixels?) and more noise at higher ISOs.

Last year I made the swap from full-frame pro Canon DSLR to sub-frame, micro-four thirds mirrorless Lumix GH5, and I am loving it. It was a huge change for me, and not something I did lightly - you can read my DSLR vs Mirrorless discussion about my switch here. A year later, Lumix were so stoked with the shots I was getting with their kit that they made me a Global Ambassador, just a few weeks ago!

Did you find this tutorial helpful?

photo tours


Then you'll probably love my free photography course, a ten-part video series online, covering everything from composition and exposure compensation through ISO, shutter speed and aperture to lenses and lighting! Check it out here!

To learn even more, we run small-group wildlife and landscape photo tours around Australia and the world, taking you to the best places on Earth at the best time of day - without the crowds - and with friendly, professional photographers there to help YOU get the best photos. These trips are an amazing way to improve your photography and have an incredible holiday at the same time. We'd love to share some of our favourite places with you, so hopefully we'll meet up on a tour soon. Take a look at some of our amazing photo tour destinations!

My Customers