How to photograph waterfalls | Chris Bray Photography

How to photograph waterfalls


photographing waterfalls
The classic silky, flowing waterfall photo has long been the 'bread and butter' shot for landscape photographers the world over. Ansell Adams for example, often featured flowing water in his images and Peter Dombrovskis contributed to saving the Franklin River in Tasmania by highlighting the incredible beauty of this region through his photos. It's no wonder we get asked so often how to photograph waterfalls on our photography courses and photo tours!

There's a certain surreal aura around photos capturing the soft, silky flow of cascading water, which has led many to believe this type of photo must be technically difficult. Well, the great news is it's actually much easier than you probably imagined!

What you need:
  • A camera with the ability to control shutter speed (most can).
  • A wide-angle lens (ideally, it's a landscape shot after all).
  • A tripod (or at least something to rest the camera on).
  • A waterfall (or even just a stream flowing around some rocks).

Nice, but not crucial to have:
  • A dry lens cloth (to wipe off drops of water spray!).
  • An ND (Neutral Density) filter helps get extra-slow photos.

Step 1: Composition and tripod set up


waterfall composition
It's easy to get so caught-up in the 'technical side' of photography that you forget the importance of composition. Good composition makes the difference between a good image and a great one, so do put some effort into framing up your waterfall so that the resulting image is totally awesome.

Don't be tempted to put your camera onto your tripod too early - that'll limit your creativity in finding the best spot to shoot from. Instead, start by holding your camera up to your eye (without the ND filter, if you're using one) and moving around, crouching down, zooming in and out etc until you find a composition you're pleased with. Look for compositions that fit the rule of thirds; look for leading lines (consider how the flow of the water might form leading lines too); think about your foreground elements so that the feature of the image (the moving waterfall) will be 'framed' by the static scene around it. Don't be scared to try shooting from the side, or from down low - sometimes 'looking up' towards a waterfall can dramatically change the mood of an image (but watch out for spray on the lens).
waterfall tutorial


Avoid including corners of bright sky or sunlit regions in your frame if possible - as these will tend to blow-out / over-expose, creating blank, white regions in your shot that may be unrecoverable. Conveniently, many waterfalls are nestled deep in shady valleys or canyons where direct sunlight often doesn't reach (at least until the sun is high during the middle of the day). Still, it's usually best to plan to take these slow shutter speed photos early in the morning (or late in the evening) so that the light is as soft and uniform as possible, not only to prevent these blow-outs, but also to help enable extra-slow shutter speeds.

Once you've found a composition you're happy with, then set up your tripod to hold your camera right there. You'll definitely need a tripod or at least a place to safely rest the camera without touching it, as the silky waterfall effect is only possible with a slow shutter speed of almost a second or longer, which is too long to hand-hold without blurring the whole photo!

Step 2: Focusing


waterfall focus
As with most landscape photos, you'll probably want most of your scene to be in sharp focus - from the close-up boulders to the distant trees. This large 'depth of field' will tend to happen automatically in these kind of photos because the settings we'll dial in later (the long shutter speed) usually dictate a small aperture (ie large f/#, which gives a large depth of field), so that's pretty convenient! Using a wide-angle lens will also help to make everything appear in focus. The question can still remain though - where should I focus? The answer is approximately 1/3 of the way into your scene. Certainly not right up close - so perhaps auto-focus on a rock or log somewhere vaguely in front of the waterfall. It's not super critical though as that wide-angle and large depth of field makes focusing pretty forgiving.

Focusing can sometimes be more easily done before you attach your camera to the tripod, because it can be awkward to have to re-adjust the tripod in order to aim your camera down at that spot '1/3 of the way into the scene' after you’re all set up. Other methods can be to just move your AF point down to that spot, or turn 'live-view' on, which can enable you to touch or select the part of the photo you want to focus on, without having to move the whole camera.

Once you've achieved focus - *beep* - it's handy to then switch your lens to Manual Focus (often this 'MF' switch is on the side of the lens itself), so that this focus is 'locked-in' and providing you don't bump the focus ring on the lens after that, you'll be able to take as many photos as you want without the camera hunting around to try and re-focus each time.

Now's a good time to attach any ND filter if you're using one.
waterfall turn stabiliser off

Step 3: Turn stabilising OFF


While this doesn't seem to make much difference on some cameras/lenses, it sure does make a lot of difference on many of them, and considering as your camera is nice and steady on your tripod anyway, we'd really recommend you switch stabilising OFF, even just in case - it'll help save your camera battery too. The switch for this is most commonly on the side of your lens. Different brands call it different things: OS (Optical Stabilising), IS (Image Stabilising) etc - it could also be hiding inside your camera's menu. The reason for turning stabilising off is that when there's no motion at all, many stabilising systems suffer an internal feedback, actually causing them to jitter around, creating slightly blurry images. Perhaps do a test yourself - you might be quite surprised.
waterfall iceland low iso

Step 4: Set your ISO LOW


The silky waterfall effect is revealed by a slow shutter speed. While the camera's shutter is open, anything moving in the scene (the falling water in the waterfall) will appear 'blurred' in the resulting photo. To be able to take a slow photo without over-exposing the image, you will need a LOW ISO, making the sensor less sensitive to light. A helpful way to remember this is that LOW rhymes with SLOW - you need a LOW ISO to get a SLOW photo. Use the lowest ISO your camera offers - usually ISO 100 or ISO 200, that'll also give you the least grainy noise in your photo: win-win!
histogram blown out
Highlights blowing out!

Step 5: Check your exposure


Double-check your Exposure Compensation +/- is set to zero, or even a little negative: you don't want to blow-out the highlights in the waterfall. If you want to be perfect, when you've taken your first shot (or if you have a mirrorless camera and can see a real-time histogram) check your histogram to be sure you don't have any pure white in your shot (you don't even want a small spike rising hard-up against the extreme right-hand end of the histogram) - if you do, dial your EC back a little more negative and try again. If you've got a corner of bright sky in your shot, that may well have to blow-out and result in a white spike so try and avoid this.

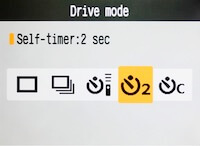
Step 6: Set your camera mode


There are three different techniques you could use to make your camera use a slow shutter speed, but we'd usually recommend option 2.

Option 1 - Shutter Priority


waterfall example
The most 'logical' approach is to turn your camera's mode dial to shutter priority ('S' mode for most cameras, 'Tv' for Canon). This setting allows you to directly dial in the shutter speed you want and the camera will automatically select the aperture value (f/#) which when used with your selected shutter speed in the current lighting conditions will result in a correctly-exposed photo (or, if you've set some exposure-compensation, then a photo with that requested exposure).

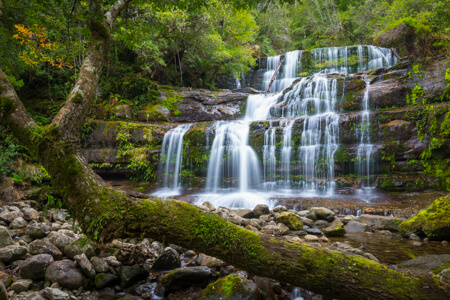
Flowing water starts to appear 'silky' if the shutter is open for at least about ¼ second. The longer (or slower) the shutter speed is, though, the silkier the flowing water will appear, so keep scrolling to even slower shutter speeds if you can. For the camera to check how much light is out there in your scene and decide if the selected shutter speed is allowable, you may need to half-press the shutter button briefly to 'wake the camera up'. Make sure to keep an eye on the automatically selected f/number when scrolling your shutter speeds though: If your f/# starts blinking at you (or flashing red, or giving some other warning) then you've scrolled your shutter speed too far (ie there's no f/# big enough, ie there's no aperture hole small-enough to prevent over-exposure with your selected shutter speed). If this happens, simply scroll your shutter speed back the other way a bit until the f/# stops blinking. It can be a bit of 'trial-and-error' feeling your way to the longest shutter speed you're 'allowed', but you'll get there.

You might find that as the morning brightens, a previously acceptable shutter speed could later result in a blinking f/#. If this happens, then you'll just have to dial back your shutter speed so it's a little faster.

TIP: Often cameras display only the fractional part of the shutter speed, so ¼ may display just as '4'. Whole seconds are usually denoted by a double quotation mark " so 4" would be four whole seconds.

Option 2 - Aperture Priority


waterfall haifoss iceland
The second method (faster and easier in our opinion) to achieving the longest shutter speed you can in a given scenario, is to actually select aperture priority on your mode dial ('A' mode for most brands, 'Av' for Canon) and scroll your f/# all the way up to the biggest f/# available (eg f/22 or more).

While it may sound odd to dial in an f/# rather than a shutter speed, remember that an f/# is actually the size of the aperture hole in the lens. A big f/# is a small aperture hole, which doesn't let in much light, so the camera will then select a long shutter speed to go with it. Don't worry - you don't actually need to get your head around this if you don't want to, but this means that rather than having to feel your way to the longest shutter speed that you're 'allowed' to use while watching for flashing f/# warnings etc (as you do using the above 'shutter speed' method), which the camera would then just pair with the largest f/# anyway, here you can just dial in the largest f/# right away, and irrespective of the lighting conditions, the camera will automatically use the longest possible shutter speed that will result in correct exposure (or whatever exposure you've set with Exposure Compensation). No more trail-and-error, no more flashing f/#s, and if the day brightens up, then the camera will automatically start using slightly faster shutter speeds for you. So easy!

Tip: If you're a little pedantic like us, then rather than using the absolute maximum f/# your lens can do, perhaps just dial the f/# back one value and use that instead. The highest f/# values can sometimes result in slightly less-sharpness in your image overall due to diffraction issues…

Option 3 - Manual Mode


how to photograph waterfalls
You can, of course, use full-on ‘Manual (M) mode’ on your camera if you really want to, or if you need to due to a really dark ND filter which makes it hard for the camera to meter properly, however manual mode is usually unnecessary. It takes longer to set up, and even if you really know what you’re doing, it has disadvantages compared with Option 2. You’d still need to use trial-and-error to find the right value, it won’t compensate for you as lighting conditions change and it’s easy to stuff up!

You'll already have set a nice low ISO (ie ISO 100), so you'll now need to set the shutter speed AND the aperture f/# yourself. You may as well start with dialling in a really large f/# for the same reasons as in Option 2, and then you'll need to dial in the correct slow shutter speed to go with it. You'll likely have to watch the camera's light-meter / exposure indicator, and keep scrolling the shutter speed until you finally reach the one that the camera says will give you correct exposure +/- 0 (or whatever exposure you want). This would have been done for you in aperture priority mode.

If you're using Manual mode because you're using an ND filter that's so dark that the camera seems unable to measure the light properly (ie Option 1 or 2 is giving you weird results), then the technique here is to still use a large f/# and then just experiment with longer shutter speeds until you get a result you're happy with. If the photo is coming out too dark, then try a longer shutter speed next time, or a smaller f/# (or if you must, a larger ISO). If the photo's too bright, then use a faster shutter speed, or a larger f/# (or lower ISO). If you need to, you can even use shutter speeds longer than the camera's usual 30-second limit by using 'Bulb' mode along with a plug-in timer release.

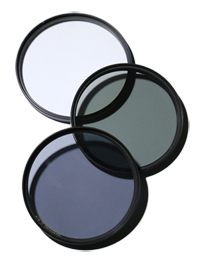
If you're completely lost and have no idea what shutter speed to use for a super-dark ND filter, then you can actually calculate it: First take a correctly-exposed, slow shutter speed shot without the ND filter attached to your lens and note down the shutter speed you managed. Fixed ND filters all have a rating that describes how much light they let though. This rating is either written as an ND number (ie 'ND8' which lets 8x less light through, thus allowing a shutter speed that's 8 times longer) or alternatively an ND filter can be rated in terms of the number of 'stops' of light it cuts out (ie a '8-stop' ND filter). These are not the same thing. Each 'stop' of light reduction actually means halving the amount of light coming through. Two stops halves it twice, so that'd be 4x less light. Three stops is 8x, four stops is 16x, eight stops is 32x, etc.

ND#
Stops
Shutter Multiplier
ND4
2-stops
4 times longer
ND8
3-stops
8 times longer
ND16
4-stops
16 times longer
ND32
5-stops
32 times longer
ND64
6-stops
64 times longer
ND128
8-stops
128 times longer

So using the above table, you should be able to work out how many times darker the world looks through your ND filter (ie a 2-stop filter is an ND4 which makes the world 4x darker) which tells you how many times longer your shutter speed can be (ie 4 times longer for an ND4) compared to your initial test photo. So if the perfect shutter speed without the ND4 filter was say 3" (3 seconds) then with it on, you would use 4 x 3" = 12" seconds (or the closest selectable value, possibly 10") and you'd end up with the same exposure.
camera inbuilt timer

Step 7: Set a 2-second timer delay or a remote


Whenever using a tripod to keep your camera steady, there's always the risk of you wobbling your camera when you press the shutter button, resulting in a slightly blurry image. Setting your 'drive mode' to use your camera's inbuilt 2-second delay (if it has one) is great for these kind of shots as it means the camera has a chance to stop wobbling before it fires off the shot. If your camera doesn't have a 2-second delay, most at least offer a 10-second countdown self-timer for group photos etc, which is just as good. Alternatively, you might have a plug-in remote for your camera, or failing all of these options, just press the shutter button as gently as you can.

Step 8: Take the shot


photographing waterfalls
Cllllllll.......llllllick! Long shutter photos can seem to take forever sometimes, but eventually you'll hear it stop, and there it is! Nailed it! Look at that silky waterfall! Just like a pro!

No? Some common issues you may be having could include:
  • Is your photo super bright / white?
    Classic problem. Chances are you're using the 'Shutter Priority' method, and you didn't realise that the shutter speed you selected was too long and the f/# was probably flashing/blinking/red trying to tell you to dial your shutter speed back a little faster to an allowable value. Half press your shutter button to get the camera to wake-up and 'test' the lighting out there, and check that the f/# is not blinking. You can not solve this problem by trying to dial down your exposure compensation: The shutter speed you've selected is so long that the camera can't even give you a normal exposure without blowing it out, it certainly can't give you a darker, under-exposed image no matter how dark you ask for with Exposure Compensation. Leave your EC on zero, and fix the problem by using a faster shutter speed.
  • waterfall shutter speed 50th
    1/50th second (too fast)
    waterfall shutter speed 1 sec
    1" second (not bad)
  • Weird dots on your photo?
    It's probably water drops of waterfall spray on your lens. Wipe it totally dry, perhaps move a bit further back or up-wind and try again. The dots could also be lens-flare, caused by stray bits of light entering the edges of your lens - if you have a lens hood, put it on. If the sun is actually in your photo, try a composition that cuts it out.
  • Not getting a slow, silky effect?
    Maybe your ISO is set to 'Auto' in which case, if you're using the 'Aperture Priority' method, the ISO will automatically be selecting a high value to give you a faster photo than we want here. Ensure you've got a low ISO set, not auto. Or, maybe there's just too much light around and even with the lowest ISO and largest f/# you simply can't get a slow enough photo to see enough movement. If it's quite sunny, this may indeed be the case. You'd need an ND filter to get a show photo in these conditions.
  • Won't take a photo at all?
    If you're pressing the shutter button all the way down and it's simply not even starting to take the photo, then chances are it's having issues trying to auto focus. Remember you're supposed to carefully focus on something 1/3 of the way into your scene first (before putting on any ND filters) and then switch your lens to Manual Focus, MF, to prevent this.
  • The camera takes ages to show you the photo?
    Twice as long, in fact? You probably have 'long exposure noise reduction' turned on in your camera's menu. Long exposures tend to create higher 'noise'. Having this noise reduction turned on means that immediately after taking long photos, the camera will take a second photo of the same duration - but with the shutter closed - and try and remove the noise found in the 'blank' photo from the noise in your waterfall photo to hopefully result in a slightly less-noisy photo in the end. It takes ages though, and I've never found it that worthwhile, and so being impatient, I usually turn it off.

Using Filters


camera lens filters
Polarising Filters: Using a polarising filter can help cut out reflected glare from water and wet rocks as well as making any leaves or mosses look greener. It will also cut out a little light overall (like a weak ND filter) tricking your camera into thinking the day is a little darker than it really is, allowing it to use a slightly slower shutter speed for an even silkier waterfall! Win-Win! Using a polarising filter is worth trying if you have one. Remember to rotate it around until you see the desired effect in the viewfinder, and if you've got a clear UV filter on the lens already, it's best to screw that one off first before using other filters.

Neutral Density (ND) Filters: These can enable you take quite long photos (10-seconds or longer) even during bright daylight (sadly it can't overcome the harsh contrast issues of bright sunlight, however). Very dark ND filters can be difficult to use, as you can't see through them when trying to frame up the shot and the camera can't focus through them or measure the weak light correctly. You may therefore have to compose, focus and even take a test photo before putting the ND filter on, and possibly use Manual mode to select the correct shutter speed for reliable results (see above).

For more info on filters you can read our tutorial on lens filters.

Did you find this tutorial helpful?


If so, please click the 'G+' and Facebook 'Like' buttons below to help others find it (or even share this page on Facebook would be wonderful!), then enjoy other free tutorials here.


To learn even more, we run small-group photo tours around Australia and the world, taking you to the best places at the best time of day - without the crowds - and with friendly, professional photographers there to help YOU get the best photos. These trips are an amazing way to improve in your photography and have an incredible holiday at the same time. We'd love to share some of our favourite places with you, so hopefully we'll meet up on a tour soon. Take a look at some of our amazing photo tour destinations!

My Customers