Surf and Wave Photography Tutorial | Chris Bray Photography

10 Tips for Wave Photography!

jonathan ives
Tutorial by Jonathan Ives

There is something truly captivating about the surf.

Photos of breaking waves with their crisp white foam contrasting the clear blue water beneath are not only aesthetically beautiful, they are also the type of image that draws the viewer right into the photo.
photographing waves


Many people think you need to invest in expensive underwater housings if you want to capture great photos of waves. While surf photographers who hop in the water with their gear in a housing obviously have the opportunity to capture images from unique angles otherwise impossible from the shore, it is actually still possible to capture beautiful images of breaking waves without having to don a wetsuit at the crack of dawn and venture into a raging swell. Growing up near the coast I have fond memories of seeking to catch that 'perfect break’ (through the camera that is) and it remains one of my favourite photographic past-times. Since so many others also love trying to capture the perfect break, especially when on holidays, I thought I'd share with you my top 10 tips for taking photos of waves.

1) Use your long lens (and perhaps a tripod/monopod).

A long (telephoto) lens is the first lens to grab out of your bag when chasing that perfect break. It's important to fill the frame with the action and because waves break away from the shore, you'll therefore need your telephoto lens. You don't need a monster lens, though. Anything that reaches up to around 300mm will be fine. Sometimes it's possible to get away with far less, depending how close the waves are breaking to you and how much of the wave you're aiming to include in the shot. A good starting point though, is to zoom in and capture the section of the wave that first starts to break, before it spreads out too wide. These tend to make for interesting images.
long lens to photograph surf


Like most types of photography, patience is required when photographing the surf. Waves approach the beach in 'sets'. Each 'set' usually contains three of four more impressive waves in quick succession, followed by a wait of up to 4 or 5 minutes before the next decent set approaches. It can therefore be helpful to set up a tripod to take the weight of the lens and remove the struggle of having to handhold your gear for long periods of time. Monopods also work well for this type of photography and have the added benefit of being easy to maneuver. As most wave photos use quite fast shutter speeds, a tripod is not strictly needed to get sharp results. Using a 300mm lens, even a shutter speed of about 1/300th sec should be hand-holdable, and for freezing waves, you'll likely be using 1/1000th of a sec or faster, so the use of a tripod/monopod really is just an optional extra to make things easier on your arms.
AI Servo focus for surf and wave photography

2) Select 'Tracking/AF-C/Servo AF' on your Autofocus Mode

As the wave approaches, it's often hard to predict exactly when it will break. To help keep the wave in focus as it approaches, switch your Autofocus mode from 'One Shot' (or AF-S) to 'Servo' (or AF-C). This will enable you to half-press the shutter button to focus on an incoming wave that looks like it might be going to break and, by keeping your finger half pressed, the camera will automatically adjust the focus as the wave approaches until you take the shot. Since the wave is continuously travelling towards you, if you were to remain in 'One Shot' (AF-S) you'd constantly have to refocus yourself.
small f number to take photos of waves

3) Go for a Small Depth of Field.

Using a small depth of field helps guide the viewer's eye to the interesting part of the wave and blurs the scene behind and in front of this point, blurring out the background in the distance and the uninteresting elements from the wave in front. To get a small depth of field just select Aperture Priority on your mode dial (Av on Canon or A on other brands) and scroll to the smallest f/number you can. Not only will this ensure you get a small depth of field, it will also help you achieve a fast shutter speed to snap freeze the motion of the wave.
animated wave photos

4) Set your Drive Mode to continuous shooting and take several shots.

Inside each DLSR's 'Drive Mode' there are several options. For everyday shooting normally 'Single Shot' is the preferred option, meaning if you hold your finger down on the shutter button the camera will only take a single photo. When taking action shots though, it's often hard to predict exactly when the best moment is going to occur, particularly when it happens at great speed. This is definitely true in wave photography. The best option is therefore to switch your drive mode into 'Continuous shooting', or even 'High-speed continuous' if that option exists in your camera. When Continuous Shooting is selected the camera will take photos, one after another continuously, for as long as the shutter button is held down. Since the wave breaks very quickly, continuous shooting allows you to fire away several shots in quick succession and then pick the most photogenic wave shape from the series later.
filters for surf photos

5) Use a polarising filter.

Everyone knows that waves look amazing when viewed through polarised sunglasses. All of a sudden the glare disappears and, if the water is clear, it's possible to see right through the wave, see the sand below, sea weed (or even dolphins) inside it. The same thing occurs when you put a polarising filter on your lens. Once screwed on and rotated for maximum effect, it'll reduce glare on the surface of water and bring back the rich blues and greens in the scene - perfect for when photographing waves. Just be aware that polarising filters, just like sunglasses, will often reduce a little bit of the light coming into the lens meaning that (when shooting in Aperture Priority) your camera will automatically slow down the shutter speed a little to compensate for this. To ensure you're still getting a quick enough shot to snap freeze the water, simply bump up your ISO a little higher when using a polarising filter. (Click here for our tutorial on using filters.)
best lighting for wave photos

6) Think about your lighting.

Lighting is critical in all types of photography and surf photography is no exception. Harsh lighting in the middle of the day tends to be the worst time for taking photos. In terms of exposure, it's difficult for your camera to cope with the extreme difference between the bright highlights created by the white wash in the crashing wave and the darker areas of unbroken water. For this reason, mornings and afternoons are the best time to capture waves. The lighting is 'warmer' and much less 'harsh' making the colour of the water richer and the exposure in the resulting photo more even - less blow-outs in the highlights
wave lighting example


The correct direction of the sunlight as it hits the wave is also something that can really enhance the photo. In the morning and afternoons the sun is lower in the sky, meaning it passes through the middle of the wave rather than coming from directly above. 'Back-lighting' (light coming from behind the subject) is traditionally a little difficult to photograph but when used creatively it can have incredible results where the wave seems to glow from within. When the sunlight comes from behind the wave, it pierces through the water and highlights the details of the sea spray and foam, creating some wonderful effects. This is one of the reasons why many surf photographers are up early in the morning (on the East Coast) or out at sunset (on the West Coast).
photographing spray from waves

7) Wait for an 'offshore' breeze.

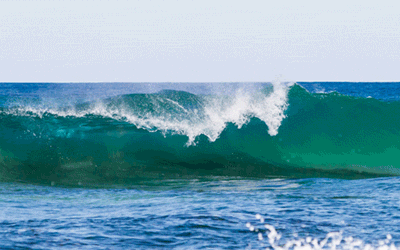
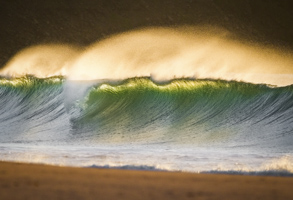
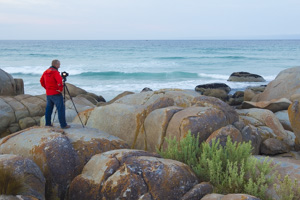
Getting the right 'shape' of wave is just as important for surfers as it is for surf photographers. Wave shape totally changes how the image looks. Of course each wave is entirely unique (which is why surf photography can be so addictive) but generally speaking the most idyllic waves are seen when the breeze is 'offshore' - meaning that the breeze is coming from the beach and blowing out to the ocean. When the breeze is offshore like this, it holds up the waves just a little, giving them a smooth 'glassy' front and, as they break, the spray is blown back over the top, forming wonderfully aesthetic misty tails as the wave rears and crashes. These conditions also help the waves spill across sideways as they break, often forming tubes of water.
spray from waves
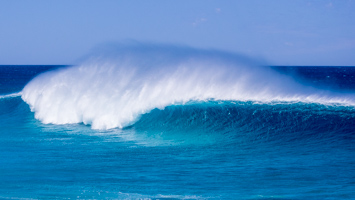
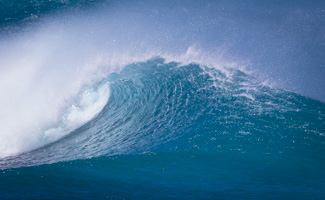
Stunning! While offshore breezes can occur at anytime, they are generally most common in the morning and usually stay around for a couple of hours after sunrise before switching direction later in the day when the 'sea-breeze' kicks in - another great reason to get up early. Of course the 'perfect' wave shape is somewhat personal preference and sometimes huge, messy, surging waves can make for really exciting images. Images of large swell tend to be dramatic and interesting, conveying the power of nature. It's often a good idea to have a quick look at the swell height on a website like Willy Weather so you don't miss these great photo opportunities.
photographing surf wave tube

8) Play around with different angles!

Most people start out taking surf photos from the shore pointing their camera straight out to the waves. While this can create some great shots, images taken from this angle can look a little flat and 2D as there isn't the sense of depth in the image and the shape of the wave tends to be somewhat lost. Walking around to the one end of the beach and shooting side-on to the swell generally creates more pleasing results. When taking the photo side on, the sense of depth and shape comes back into the shot and (if the conditions are right) it might even be possible to see down the 'tube' of water as the wave breaks.
aerial waves


aerial wave example
Changing the height that the photo is taken from can also make for some creative options. Rather than taking every photo from the shoreline, try wandering up to a headland and taking the shot looking down. This angle brings a different perspective to the wave and often makes it possible to see the pattern and refraction of the sets as they roll into the shore and bend around the beach.

On our photography tours we often try and include some sort of aerial flight to capture unique images from the air. It's amazing seeing the coastline from such a unique perspective.
framing for wave photos

9) Include some foreground to frame your shot.

The rules of good composition apply to almost all photographic subjects. Including some foreground in the shot helps to 'frame' the subject and guides the viewer's eye to the important parts of the image. Often surf photographers will therefore try and include some rocks, sand or even coastal vegetation around the bottom or the outside edges of their image for this purpose. By using a small f/number (see tip 3) to ensure a small depth of field, these foreground elements can become softened or blurred if preferred, while still helping guide the viewer's eye to the sharp areas of the shot (the breaking wave).

10) Experiment with your shutter speeds.

Shutter speed determines how movement looks in a photo. To snap freeze movement you'll need a very fast shutter speed. This is the best starting point for surf photography. To snap freeze water a shutter speed of around 1/1000th of a second or faster is needed. If a really fast shutter speed is used (eg 1/4000th of a second) every small water droplet will appear absolutely frozen in time. To access fast shutter speeds either shoot in Aperture priority (Av or A) and turn your ISO up or flick across into Shutter Priority (Tv or S mode) and select the shutter speed you desire. By then setting your ISO on Auto (see Auto ISO tutorial) your camera will adjust ISO for you along with your Aperture to ensure the photo is taken at the exact shutter speed you requested.
fast wave
An alternative option for photographing waves which can give intriguing results is to select a slower shutter speed and accentuate the sense of movement in the image. Any movement occurring while the shutter is open will result in movement-blur in the photo. By selecting a slow(ish) speed (eg 1/8th second) and keeping your camera on a tripod, the wave will appear streaked as it breaks. If the shutter speed is much longer than that you'll likely just end up with a very blurry wave, but it's worth experimenting for some creative results! Once again, to control your shutter speed simply use Shutter Priority on your mode dial (Tv or S mode) and select the shutter speed you would like. If it's a really bright day it might not be possible to get longer speeds as too much light would otherwise pour into the camera (it'll flash your f/# at you as a warning if you try too slow a shutter speed) so this option is worth trying in the early morning or in the later afternoon.

Did you find this tutorial helpful?


If so, please click the 'G+' and Facebook 'Like' buttons below to help others find it, then enjoy other free tutorials here.

Thanks!


My Customers